> ## Documentation Index
> Fetch the complete documentation index at: https://docs.messagedesk.com/llms.txt
> Use this file to discover all available pages before exploring further.
# Create, Delete, Filter & Import Contacts
> Create, delete, filter, and import MessageDesk contacts one at a time or in bulk via CSV. Covers required formats, validation rules, and import limits.
# Add individual contacts one-by-one, or import many via CSV
You can create a single contact or bring in thousands at once with a CSV. Here's how, and the limits to avoid errors.
***
## Add an individual contact
### 1. Go to **Contacts**
Click **+ Add Contact**. On desktop, this opens a dialog where you can create the contact without leaving the page.
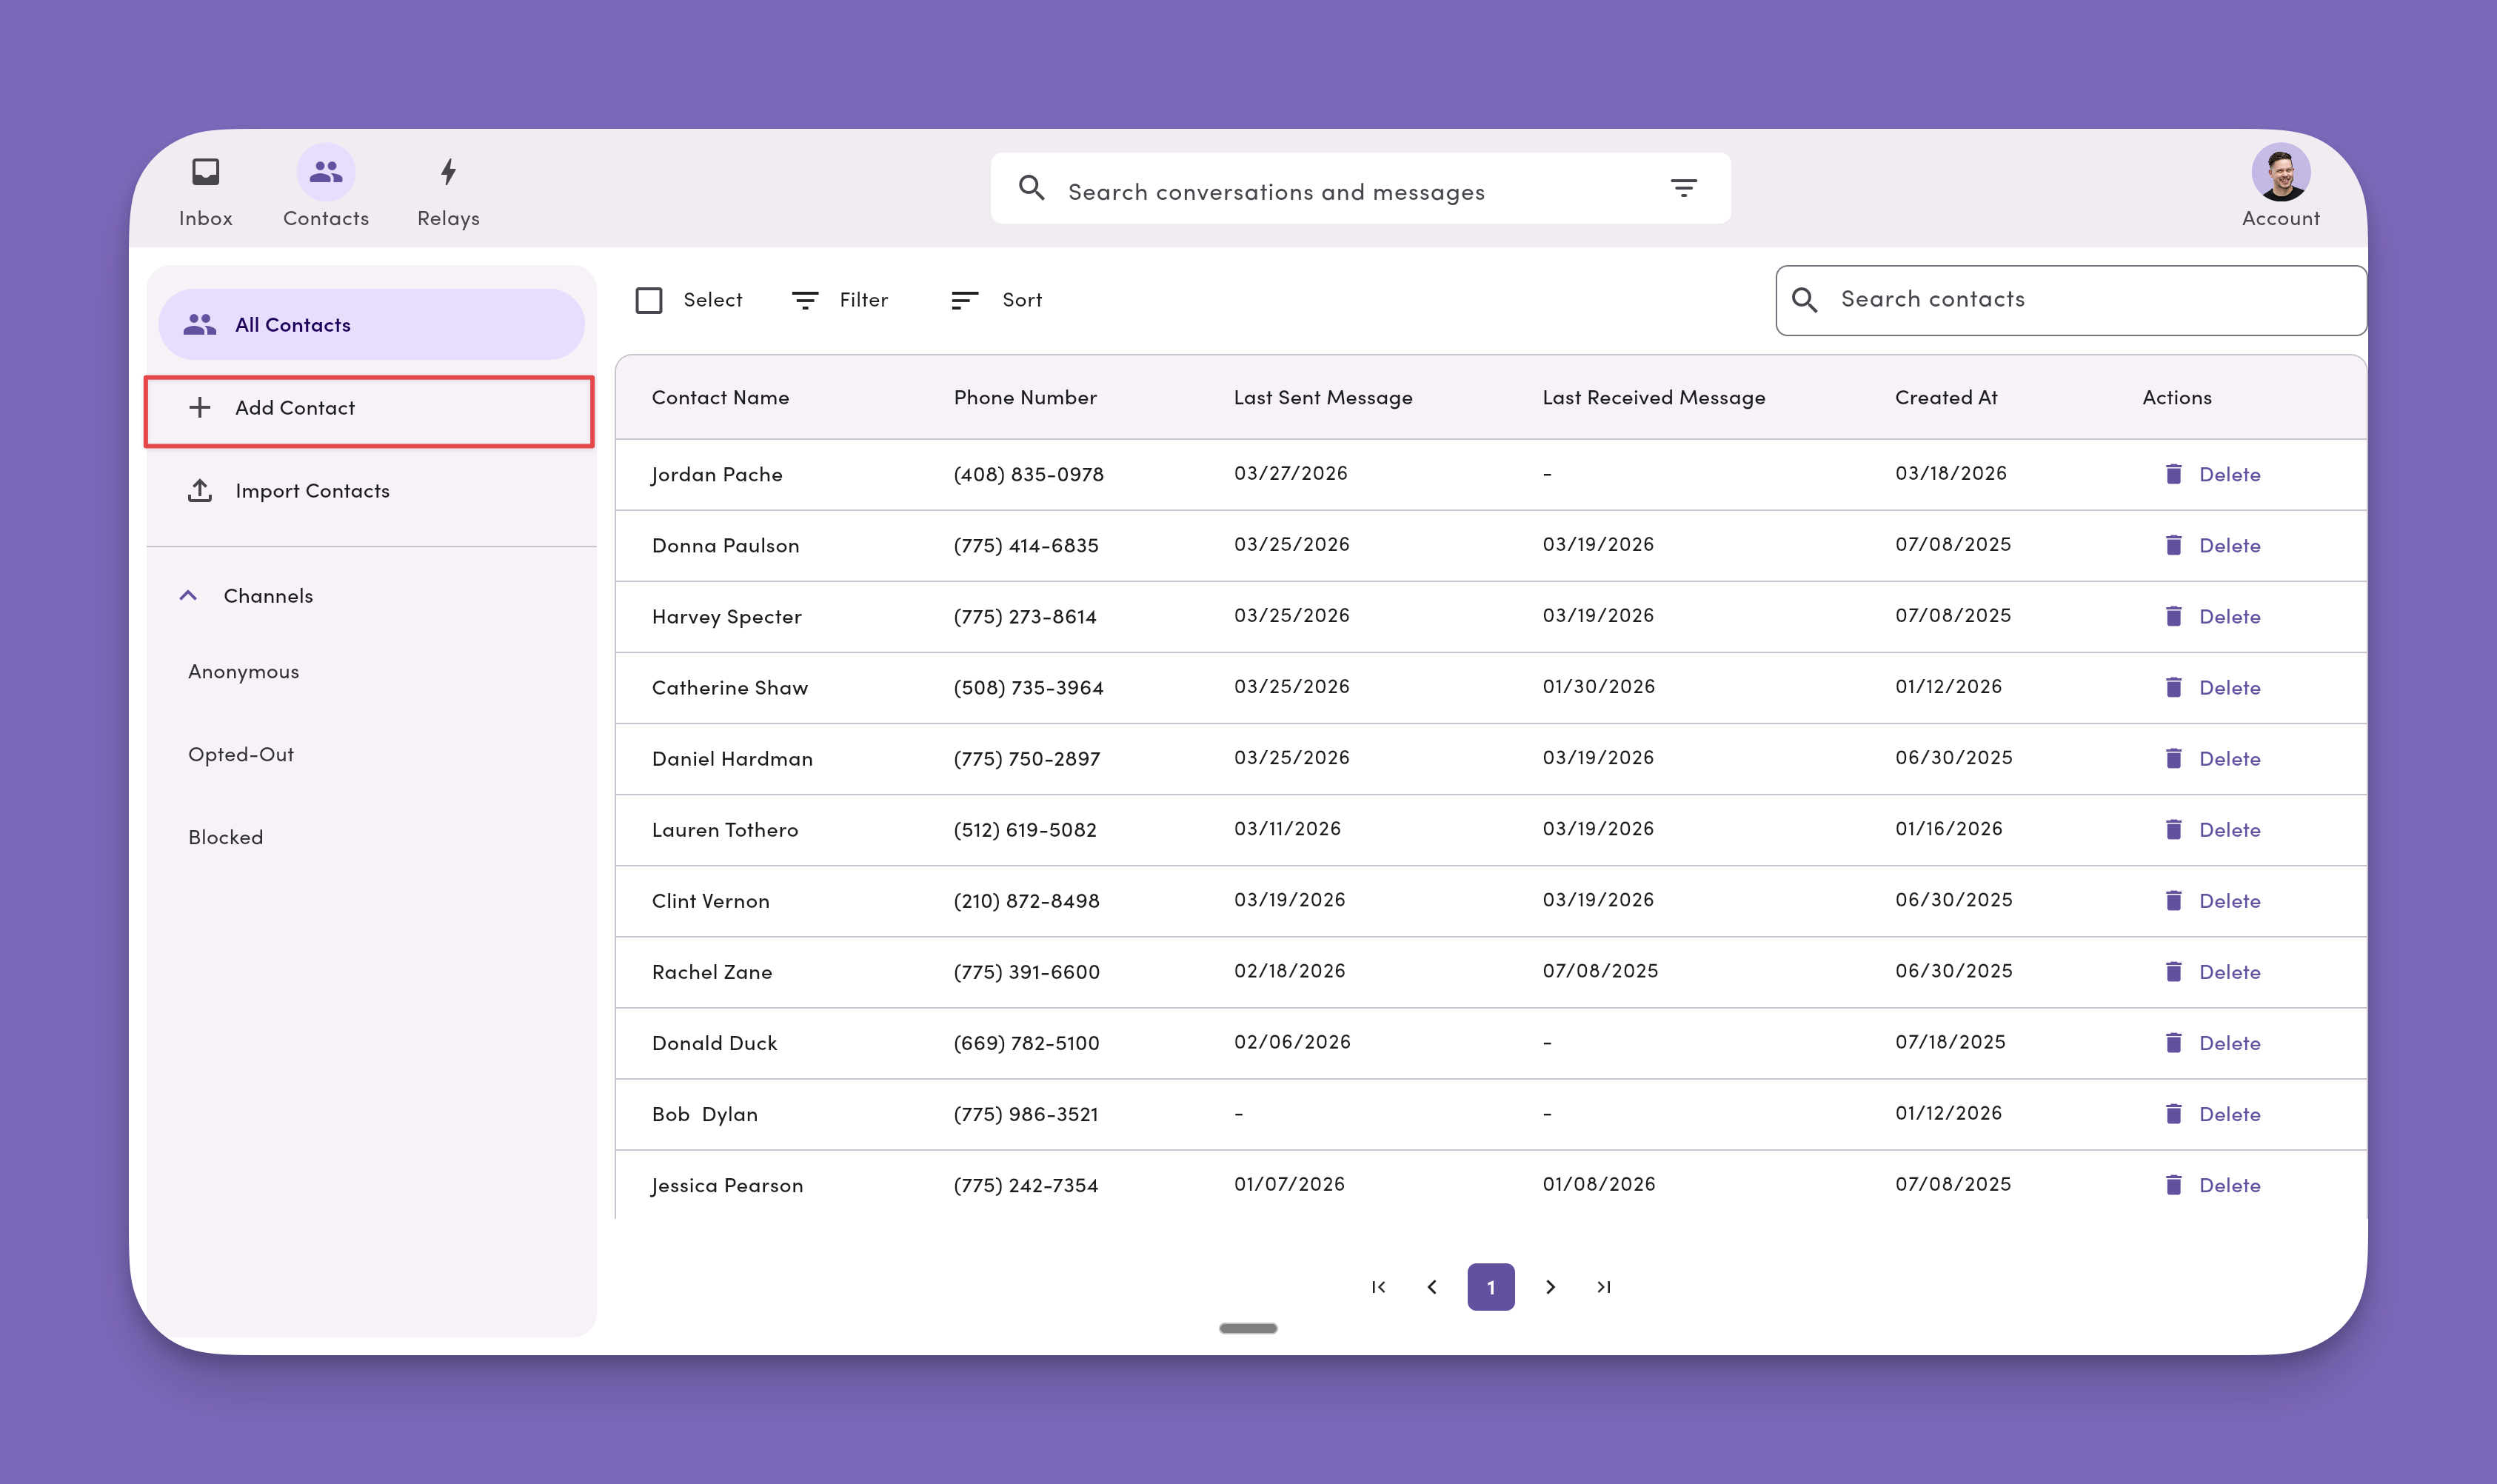 On mobile, clicking **+ Add Contact** navigates to a separate page instead of opening a dialog.
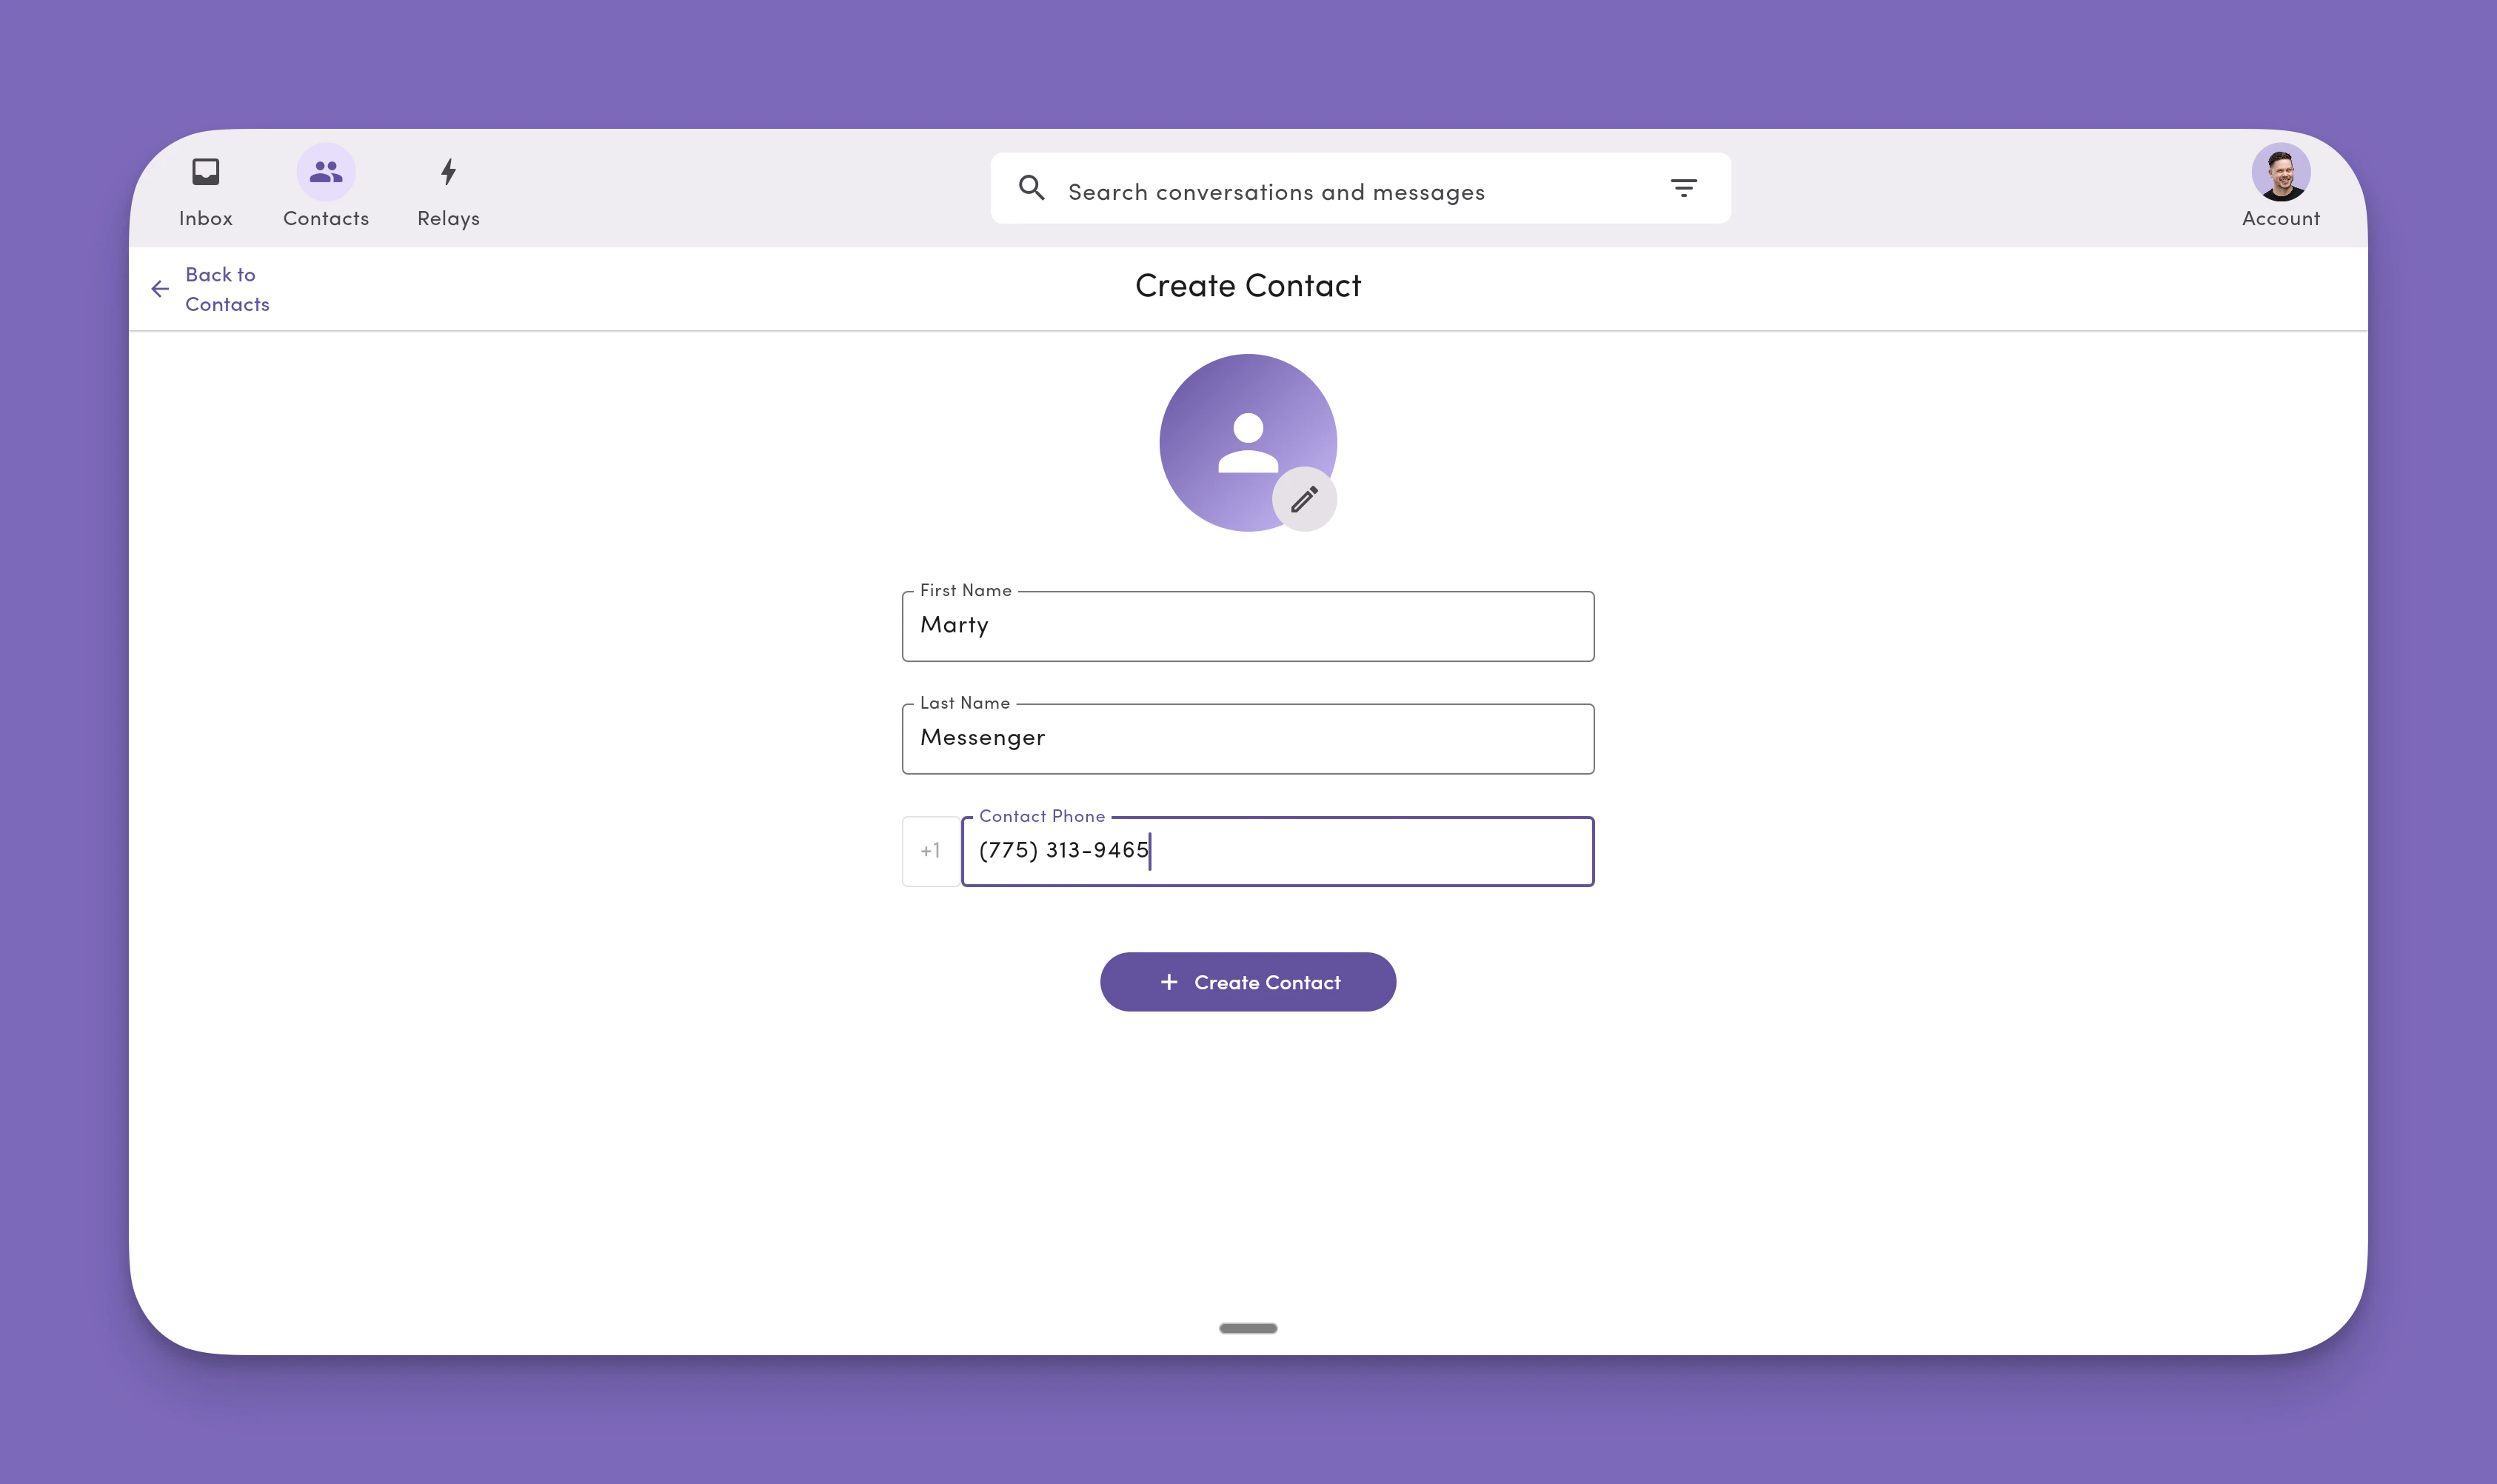
### 2. Enter details
Add **First name**, **Last name**, and **Phone**, then click **+ Create Contact**.
First name, last name, and phone number are **required when creating contacts**. Phone numbers without names are treated as **anonymous contacts** until you add contact details later.
If the phone number already belongs to another contact, you'll see an error. Phone numbers are **unique identifiers** in MessageDesk (one number → one contact). A single contact can have **multiple** numbers.
On mobile, clicking **+ Add Contact** navigates to a separate page instead of opening a dialog.
### 2. Enter details
Add **First name**, **Last name**, and **Phone**, then click **+ Create Contact**.
First name, last name, and phone number are **required when creating contacts**. Phone numbers without names are treated as **anonymous contacts** until you add contact details later.
If the phone number already belongs to another contact, you'll see an error. Phone numbers are **unique identifiers** in MessageDesk (one number → one contact). A single contact can have **multiple** numbers.
 ### 3. View and edit the contact
From the contact panel, you can:
1. Add additional phone numbers.
2. Copy the contact's number.
3. Send a message from the Inbox.
4. Unlink ("delete") a number from the profile.
5. Block the contact from messaging your workspace.
Changing a contact's primary phone may **unlink** past conversations from the profile.
### 3. View and edit the contact
From the contact panel, you can:
1. Add additional phone numbers.
2. Copy the contact's number.
3. Send a message from the Inbox.
4. Unlink ("delete") a number from the profile.
5. Block the contact from messaging your workspace.
Changing a contact's primary phone may **unlink** past conversations from the profile.
 ***
## Delete or edit a contact
To permanently remove a contact from your workspace:
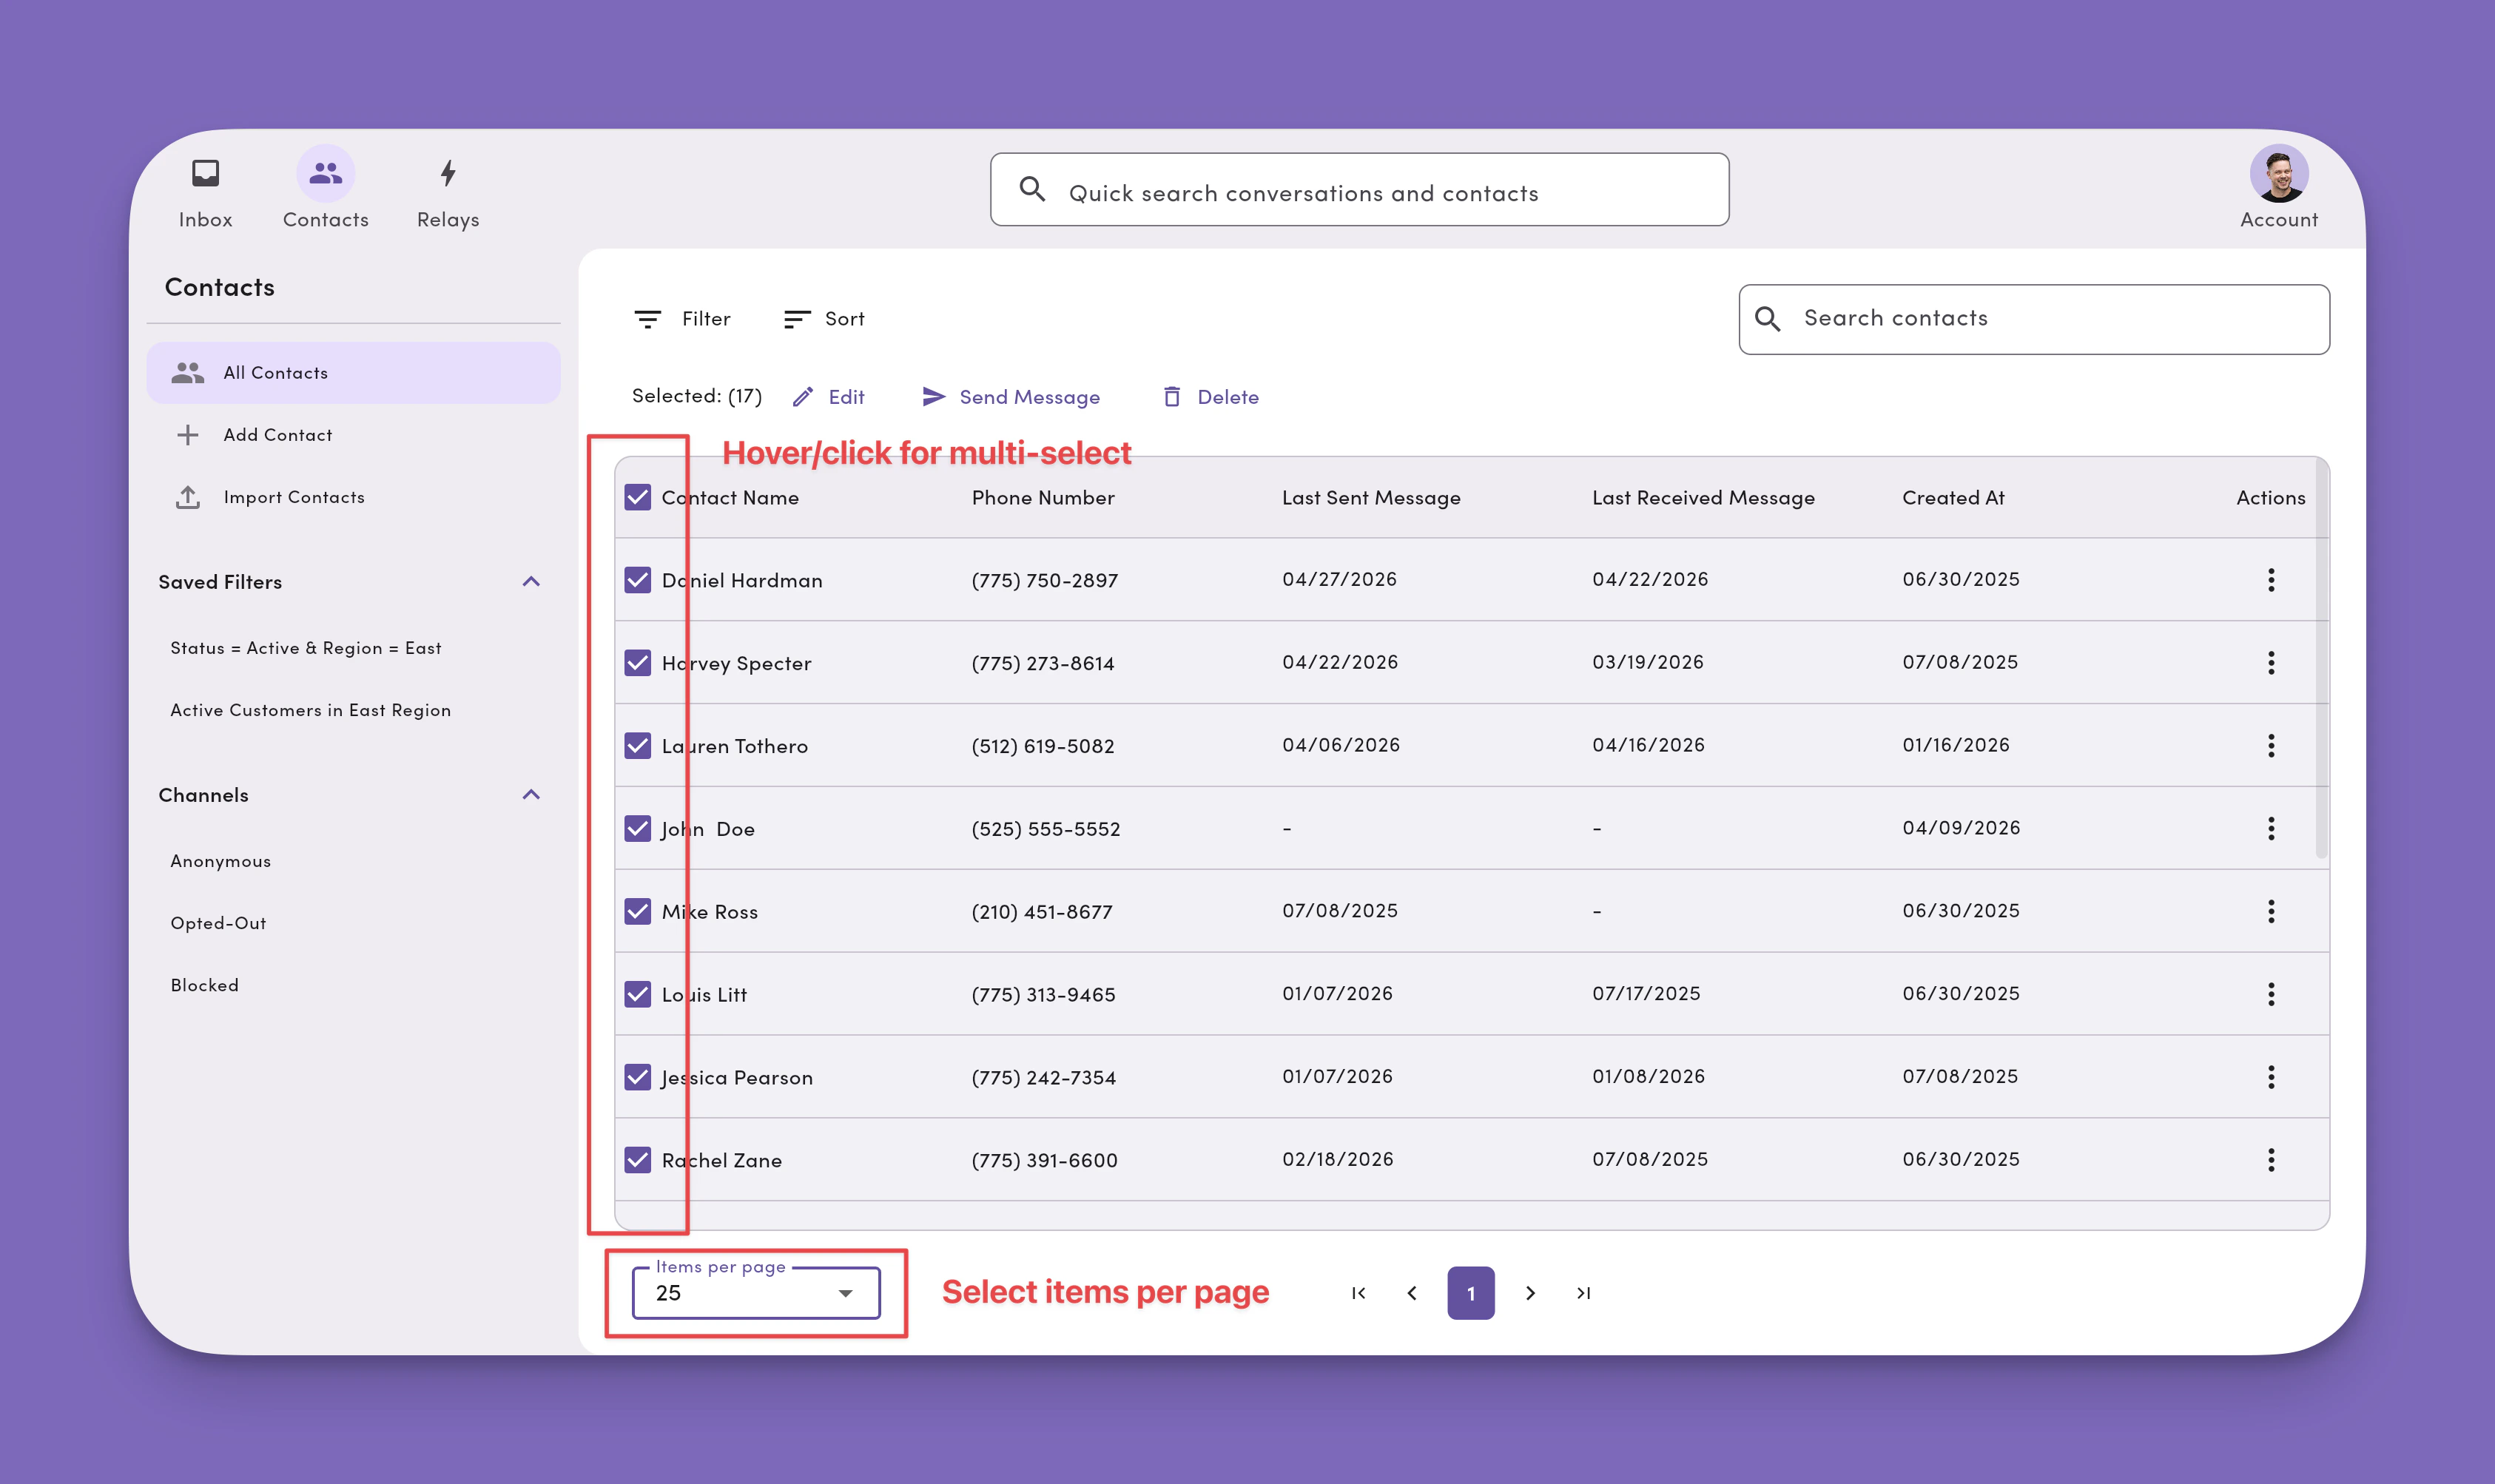
1. Go to **Contacts**.
2. Find and select the contact(s) you want to delete.
3. Select your **items per page** (25, 50, 100, or 250)
4. Hover and click to select individual contacts or multiselect the entire page
5. Click the **vertical ellipse icon** to delete an individual contact.
6. Confirm the deletion or edit when prompted.
Deleting a contact is **permanent** and can't be undone. MessageDesk preserves the contact's conversation history, but it appears as an anonymous contact.
Bulk deletes are processed as a single batch request. Contacts are removed from the list as the deletion completes, and a confirmation shows the total number of contacts deleted.
***
## Delete or edit a contact
To permanently remove a contact from your workspace:
1. Go to **Contacts**.
2. Find and select the contact(s) you want to delete.
3. Select your **items per page** (25, 50, 100, or 250)
4. Hover and click to select individual contacts or multiselect the entire page
5. Click the **vertical ellipse icon** to delete an individual contact.
6. Confirm the deletion or edit when prompted.
Deleting a contact is **permanent** and can't be undone. MessageDesk preserves the contact's conversation history, but it appears as an anonymous contact.
Bulk deletes are processed as a single batch request. Contacts are removed from the list as the deletion completes, and a confirmation shows the total number of contacts deleted.
 ### Sort contacts
Click the **Sort** dropdown menu above the contacts list to change the sort order. Available sort options include:
* **Alphabetical by first name (A–Z)**
* **Alphabetical by last name (A–Z)**
* **Newest:** most recently added or updated contacts at the top
* **Oldest:** oldest contacts at the top
Sort is a **dropdown menu** (not a toolbar). Open the menu, pick an option, and the contacts list re-orders immediately.
### Search contacts
The search bar appears **only on filtered Contact views** (saved filters or any applied filter). To search, first apply or open a saved filter, then use the search bar to find contacts within that view.
The search bar is **not available on All Contacts**. Use a filter or saved filter to search a specific subset of your contacts.
***
## Filter contacts
The Contacts module lets you filter contacts based on their properties saved in MessageDesk. You can use **Criteria** and **Conditions** to create various types of filters.
### Sort contacts
Click the **Sort** dropdown menu above the contacts list to change the sort order. Available sort options include:
* **Alphabetical by first name (A–Z)**
* **Alphabetical by last name (A–Z)**
* **Newest:** most recently added or updated contacts at the top
* **Oldest:** oldest contacts at the top
Sort is a **dropdown menu** (not a toolbar). Open the menu, pick an option, and the contacts list re-orders immediately.
### Search contacts
The search bar appears **only on filtered Contact views** (saved filters or any applied filter). To search, first apply or open a saved filter, then use the search bar to find contacts within that view.
The search bar is **not available on All Contacts**. Use a filter or saved filter to search a specific subset of your contacts.
***
## Filter contacts
The Contacts module lets you filter contacts based on their properties saved in MessageDesk. You can use **Criteria** and **Conditions** to create various types of filters.
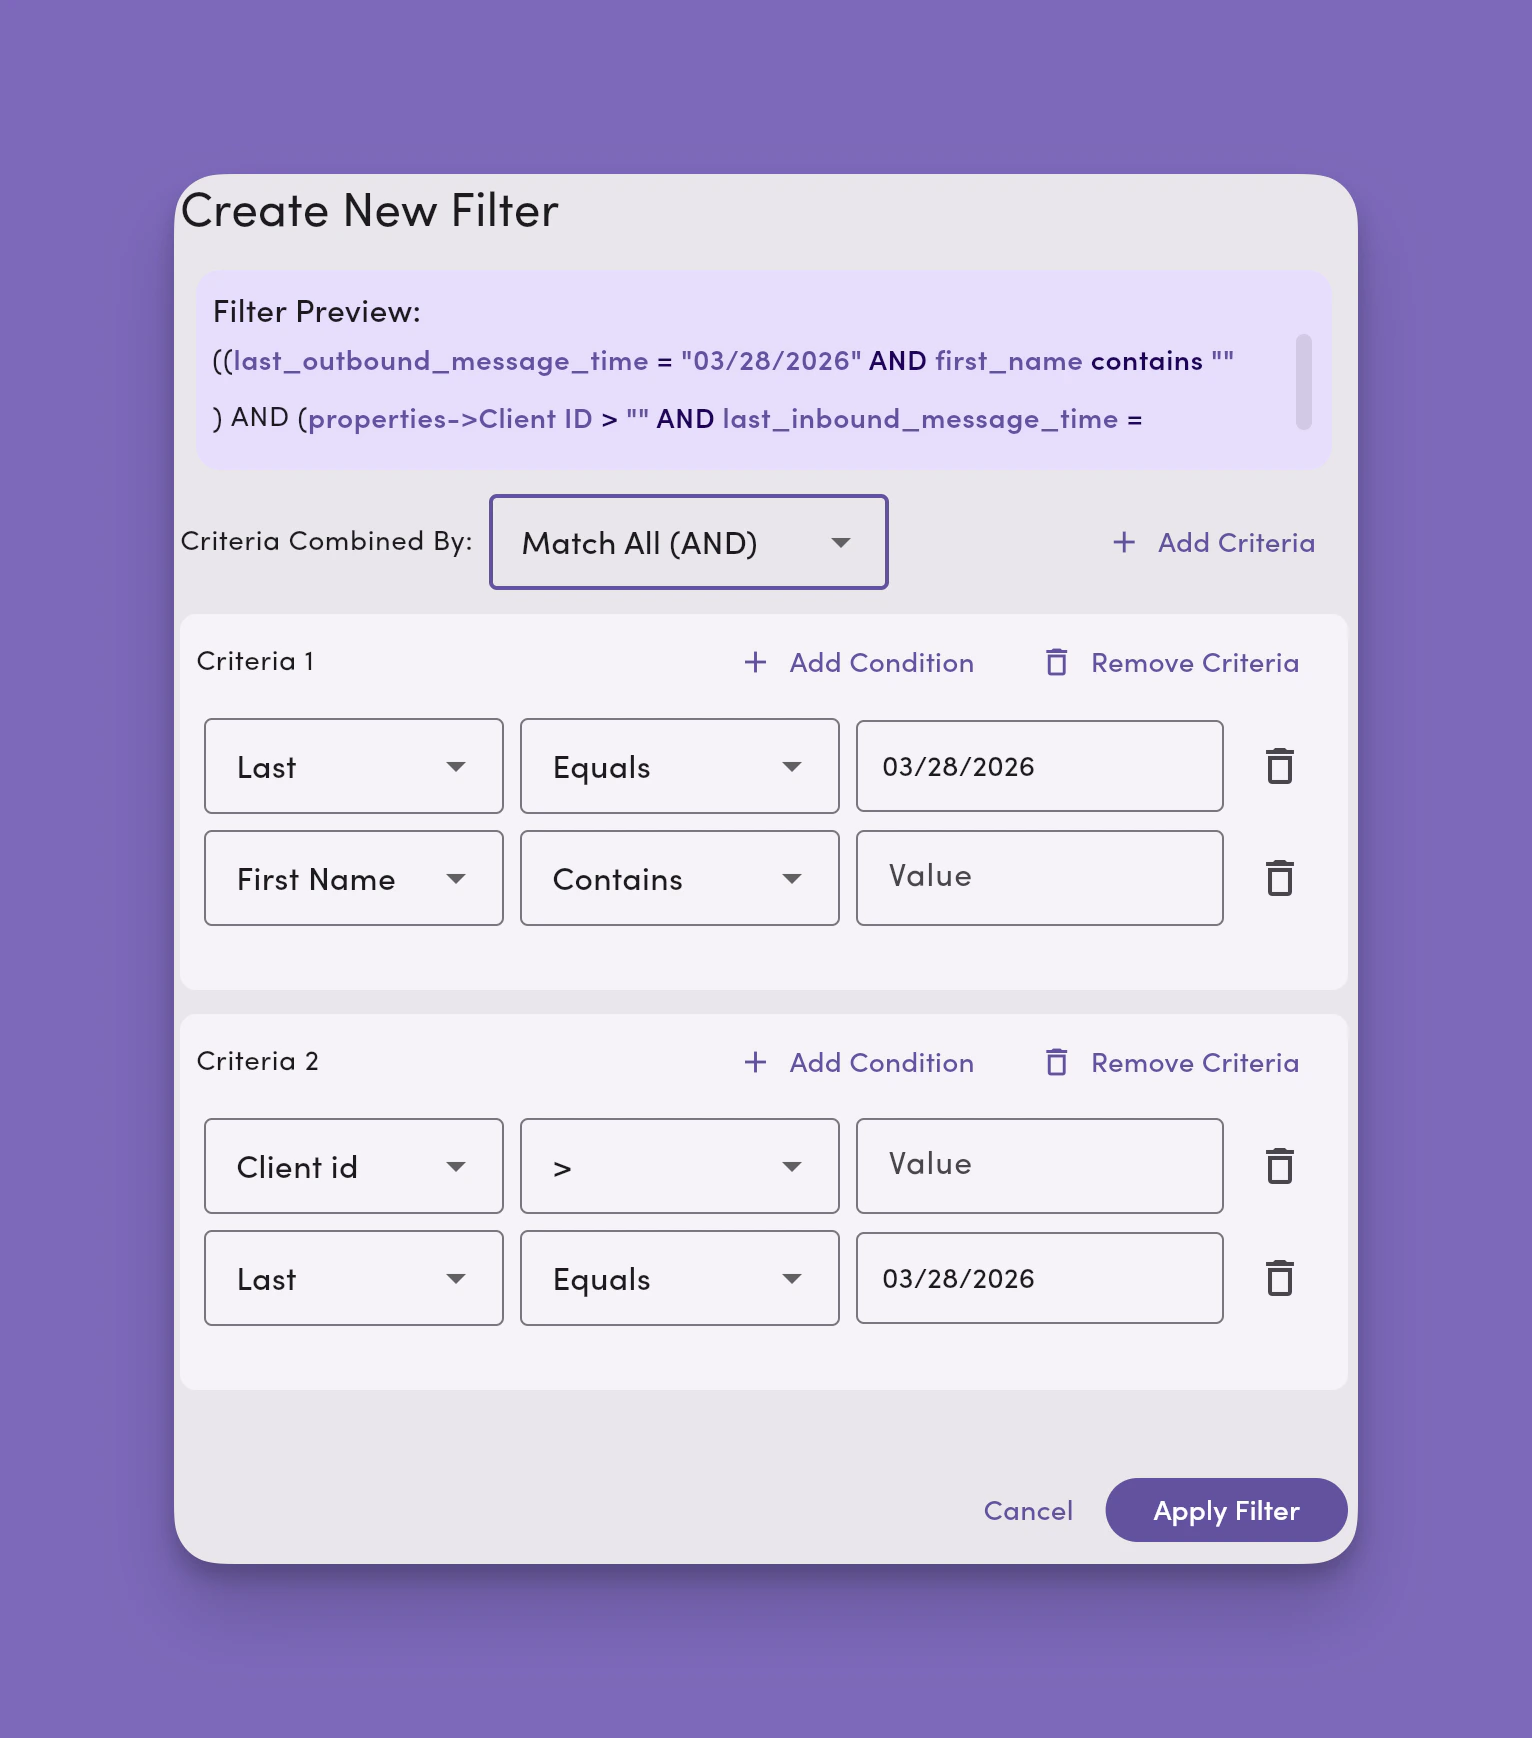 ### Add criteria
Criteria are a set of conditions. You can add as many criteria as you like to a filter. As you add criteria, you'll see a filter preview.
Criteria work in two ways: creating AND and OR statements.
* **Selecting Match All (AND)** means all criteria must meet the filter's conditions.
* **Selecting Match ANY (OR)** means any criteria must meet the filter's conditions.
### Add conditions
Conditions are based on data fields saved and populated as part of the contact's profile in MessageDesk.
You set your filter on conditions on standard fields like:
* First Name
* Last Name
* Last Outbound Message Time
* Last Inbound Message Time
You can also set filter conditions based on [**custom fields**](/settings/workspace-settings/custom-fields) added to MessageDesk.
### Condition operators
Use condition operators to create logical expressions for your filters. The types of operators available depend on the field's data type (true/false, dropdown, date, number, phone, and text).
#### Available condition operators
* Contains
* Equals
* In
* Is Empty
* \> (greater than)
* \>= (greater than or equal to)
* \< (less than)
* \<= (less than or equal to)
* NOT Contains (does not contain)
* NOT Equals (does not equal)
Once you're satisfied with your filter, click **Apply Filter** to view a list of contacts matching your filter conditions and criteria.
### Save and edit filters
### Add criteria
Criteria are a set of conditions. You can add as many criteria as you like to a filter. As you add criteria, you'll see a filter preview.
Criteria work in two ways: creating AND and OR statements.
* **Selecting Match All (AND)** means all criteria must meet the filter's conditions.
* **Selecting Match ANY (OR)** means any criteria must meet the filter's conditions.
### Add conditions
Conditions are based on data fields saved and populated as part of the contact's profile in MessageDesk.
You set your filter on conditions on standard fields like:
* First Name
* Last Name
* Last Outbound Message Time
* Last Inbound Message Time
You can also set filter conditions based on [**custom fields**](/settings/workspace-settings/custom-fields) added to MessageDesk.
### Condition operators
Use condition operators to create logical expressions for your filters. The types of operators available depend on the field's data type (true/false, dropdown, date, number, phone, and text).
#### Available condition operators
* Contains
* Equals
* In
* Is Empty
* \> (greater than)
* \>= (greater than or equal to)
* \< (less than)
* \<= (less than or equal to)
* NOT Contains (does not contain)
* NOT Equals (does not equal)
Once you're satisfied with your filter, click **Apply Filter** to view a list of contacts matching your filter conditions and criteria.
### Save and edit filters
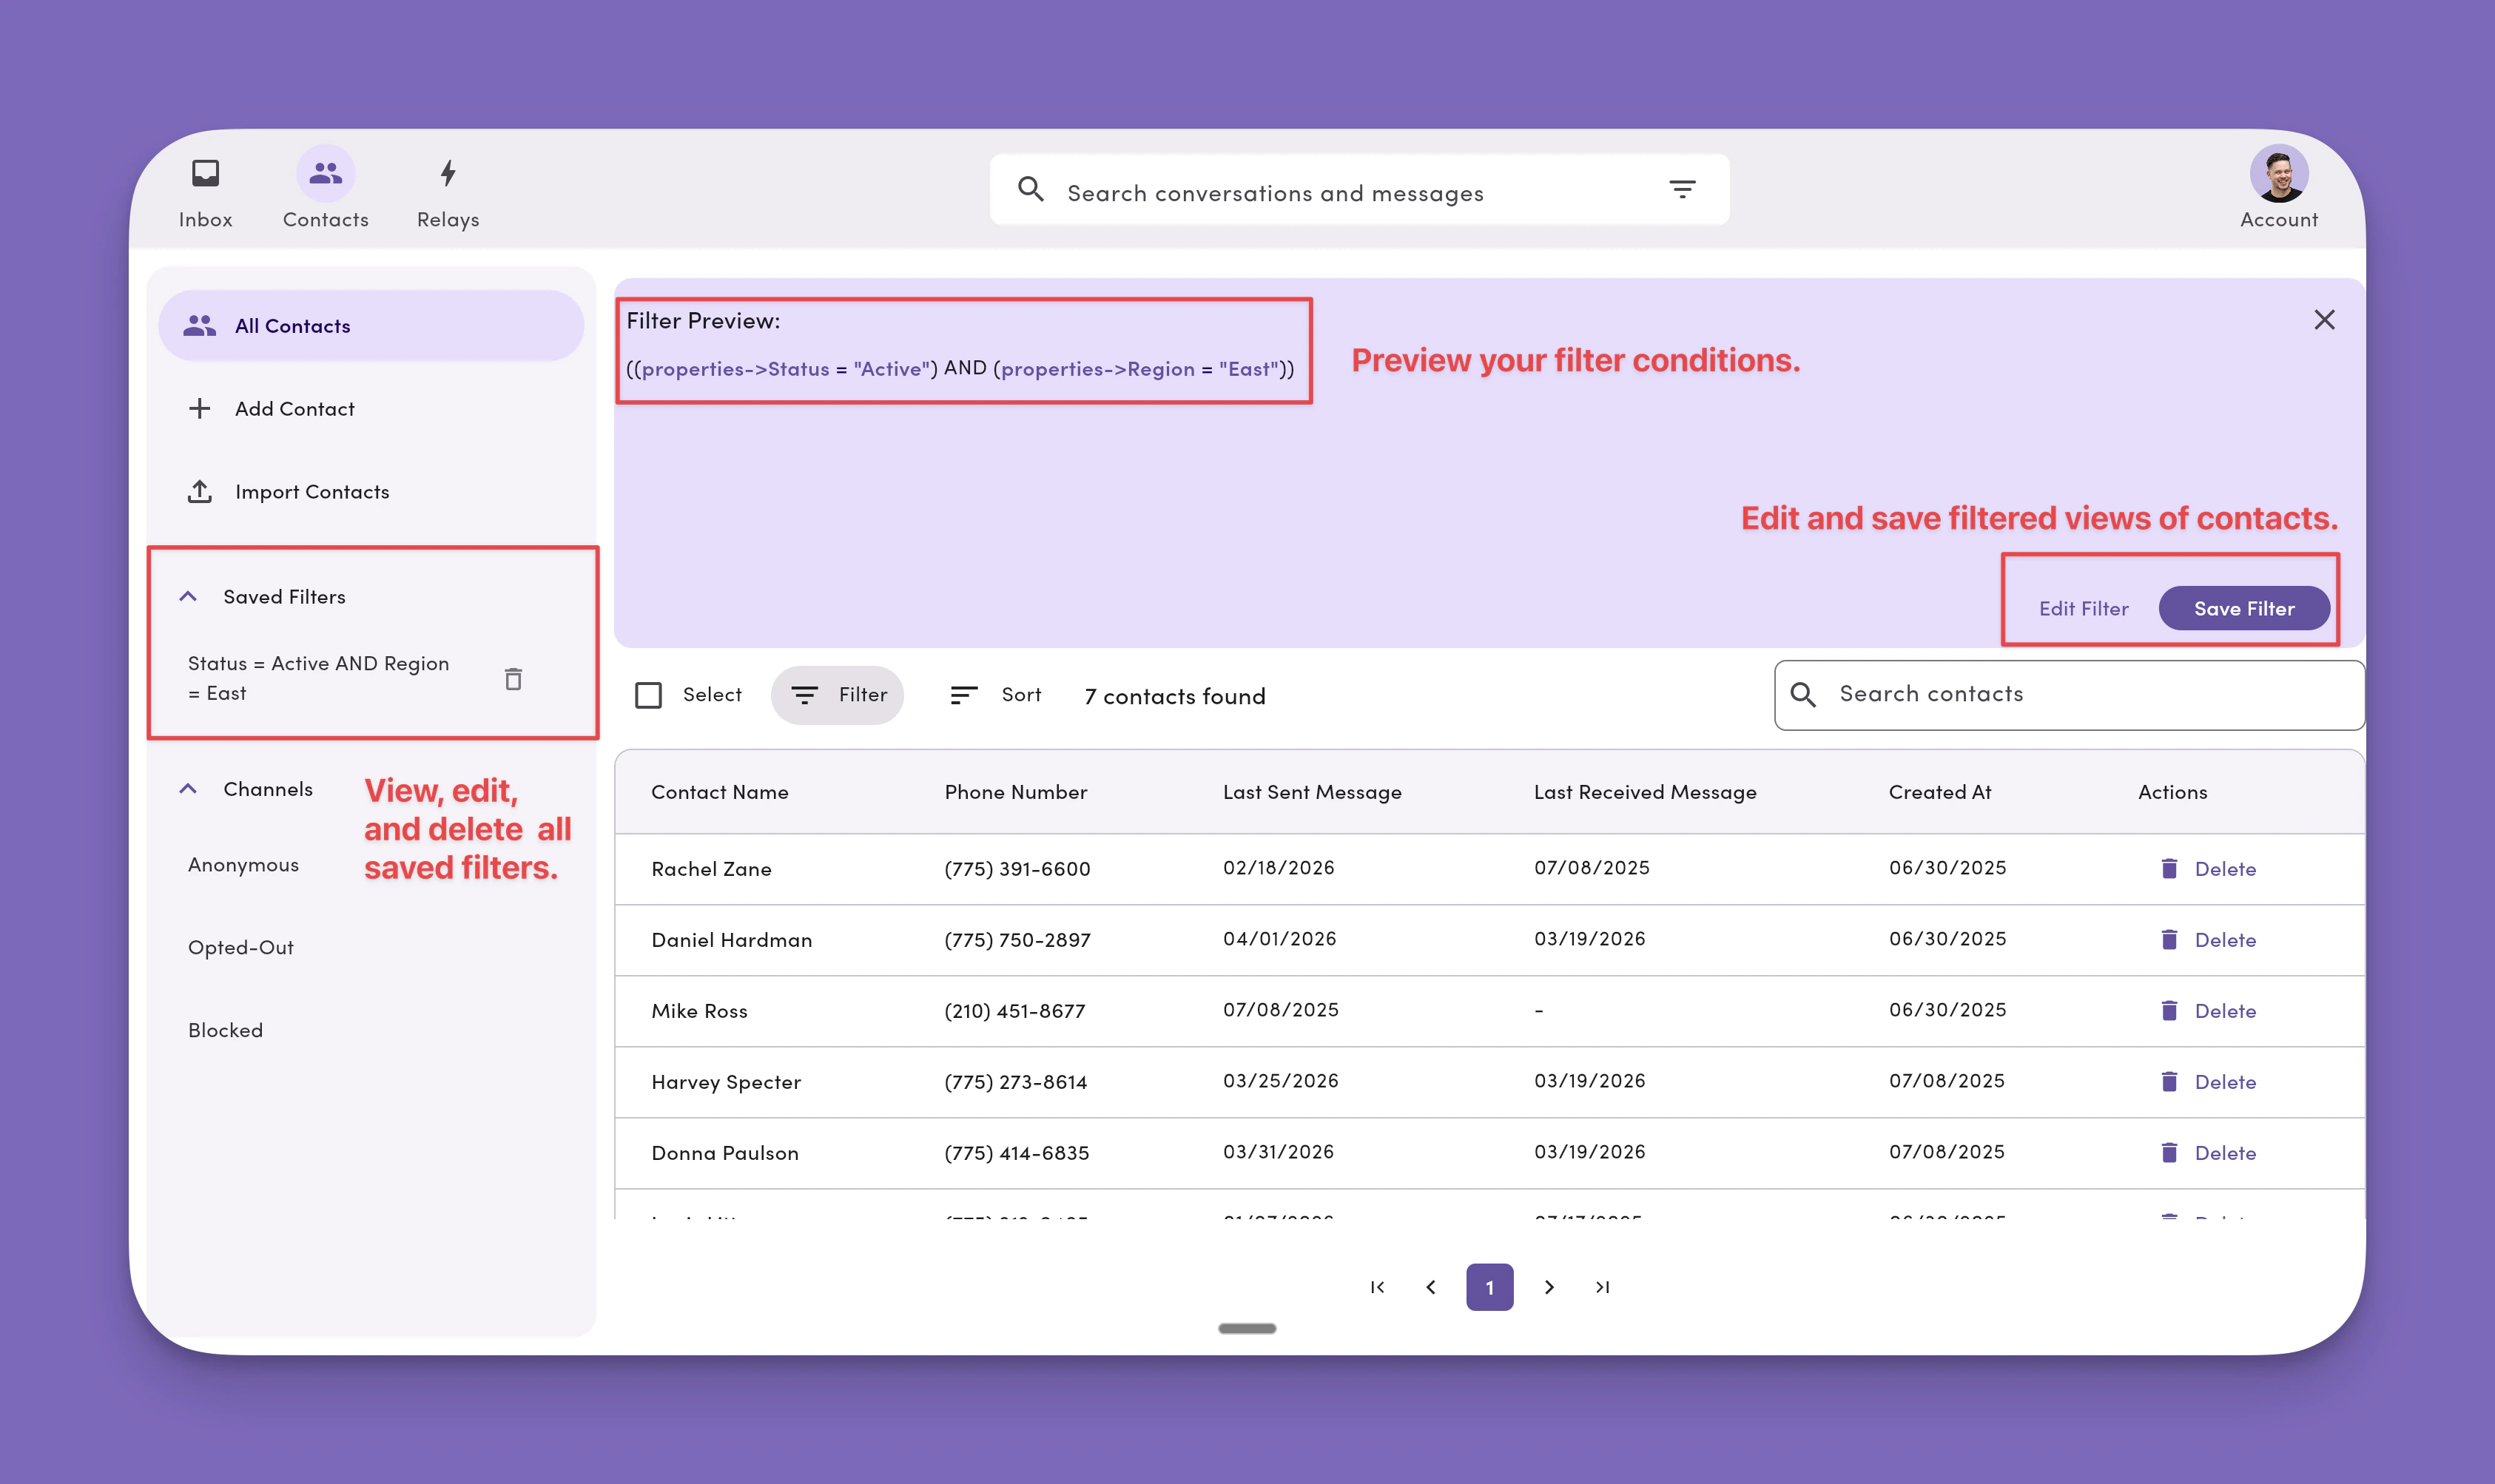 After applying a filter, you can save it for quick access later:
1. Click **Save Filter**.
2. Give your filter a name.
3. Click **Save**.
Saved filters appear in the **side menu** of the Contacts module. Click any saved filter to instantly view the contacts that match its criteria.
### Search saved filters
Use the search widget in the Contacts side menu to quickly find a saved filter by name. Selecting a result navigates to Contacts with that filter applied.
Saved filter search is available on the **desktop web app only**. It's not available on tablet or mobile, since filters can't currently be managed in Contacts on those platforms.
* Search matches against the **filter name only** (not its criteria or conditions).
* The widget follows the same design as the global search bar and the Contacts search bar for a consistent experience across MessageDesk.
### Delete a saved filter
To remove a saved filter:
1. Delete the saved filter from the Contacts side menu.
***
## Import contacts in bulk via CSV
Upload contact lists in bulk when you have a large amount of contact information to bring into MessageDesk.
### CSV limits and requirements (read first)
**TL;DR**
* **Row count:** up to **5,000 rows** per CSV (hard limit)
* **File size:** up to **10 MB**
* **Platform:** **Web-only** (imports aren't supported on mobile/desktop apps)
* **Format:** must use **.csv** files **with a header row**, **UTF-8** encoding
* **Required per row:** **Email** *or* **Phone** (at least one)
**Your CSV must:**
* Include a **header row** (first line in .csv file).
* Use **consistent columns** on every row (same number of columns as the header).
* Include at least one contact method: **Email** *or* **Phone** per row.
* Preferred: Use **E.164** format for phone number formatting (e.g., `+15551234567`).
Download: [**Make a copy of our sample contact import .csv template here**](https://docs.google.com/spreadsheets/d/1P8JIfQngIJnMRo5cfCEf8gdxvIKpzmoeLEAfImYII58/copy).
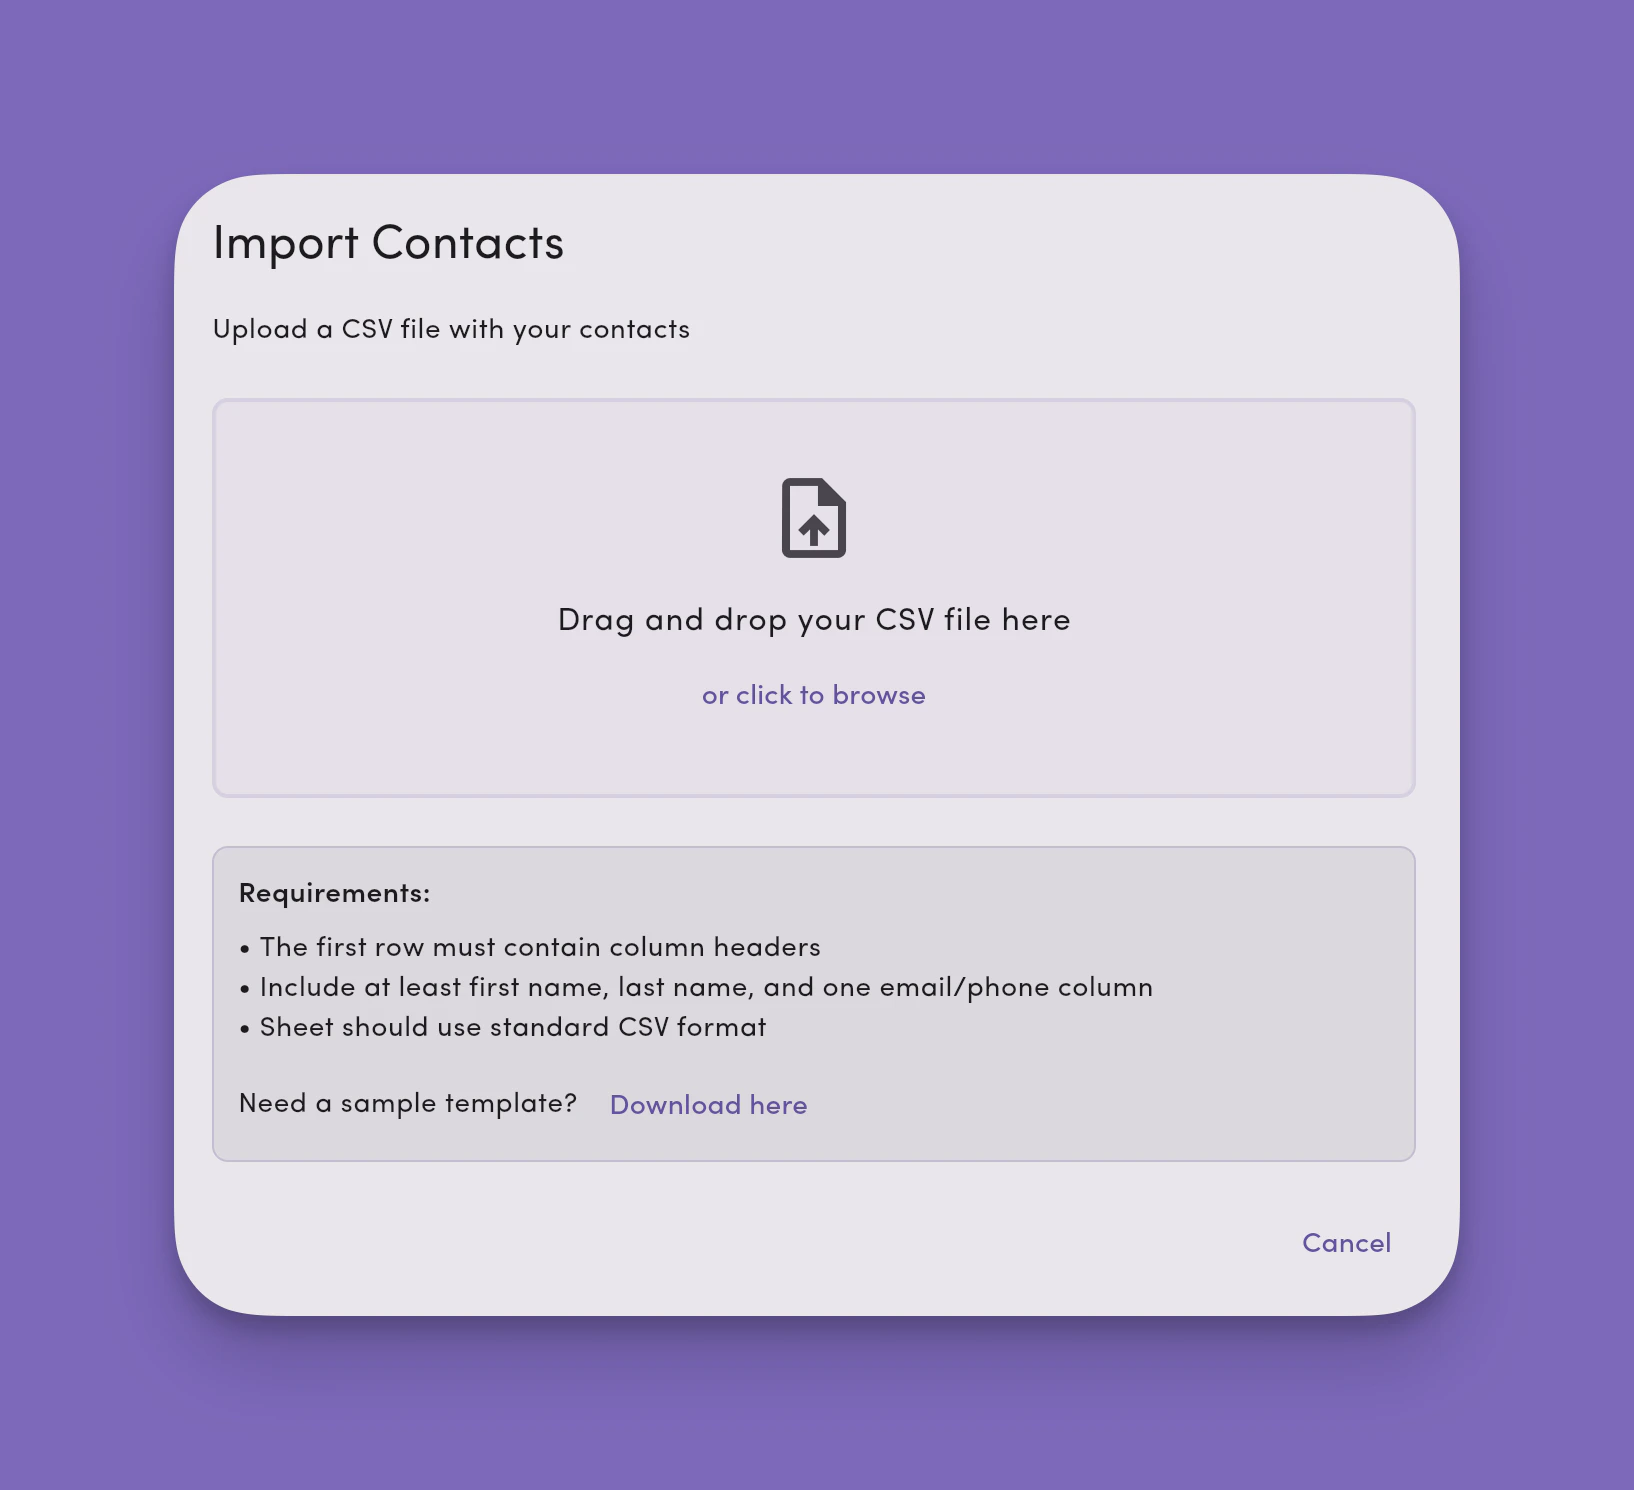
### 1. Go to **Contacts** → **Import Contacts**
Click **Import Contacts**.
**Note:** You can also access the contact import feature from **Settings → Workspace Settings → [Data Center](/settings/workspace-settings/data-center)**
After applying a filter, you can save it for quick access later:
1. Click **Save Filter**.
2. Give your filter a name.
3. Click **Save**.
Saved filters appear in the **side menu** of the Contacts module. Click any saved filter to instantly view the contacts that match its criteria.
### Search saved filters
Use the search widget in the Contacts side menu to quickly find a saved filter by name. Selecting a result navigates to Contacts with that filter applied.
Saved filter search is available on the **desktop web app only**. It's not available on tablet or mobile, since filters can't currently be managed in Contacts on those platforms.
* Search matches against the **filter name only** (not its criteria or conditions).
* The widget follows the same design as the global search bar and the Contacts search bar for a consistent experience across MessageDesk.
### Delete a saved filter
To remove a saved filter:
1. Delete the saved filter from the Contacts side menu.
***
## Import contacts in bulk via CSV
Upload contact lists in bulk when you have a large amount of contact information to bring into MessageDesk.
### CSV limits and requirements (read first)
**TL;DR**
* **Row count:** up to **5,000 rows** per CSV (hard limit)
* **File size:** up to **10 MB**
* **Platform:** **Web-only** (imports aren't supported on mobile/desktop apps)
* **Format:** must use **.csv** files **with a header row**, **UTF-8** encoding
* **Required per row:** **Email** *or* **Phone** (at least one)
**Your CSV must:**
* Include a **header row** (first line in .csv file).
* Use **consistent columns** on every row (same number of columns as the header).
* Include at least one contact method: **Email** *or* **Phone** per row.
* Preferred: Use **E.164** format for phone number formatting (e.g., `+15551234567`).
Download: [**Make a copy of our sample contact import .csv template here**](https://docs.google.com/spreadsheets/d/1P8JIfQngIJnMRo5cfCEf8gdxvIKpzmoeLEAfImYII58/copy).
### 1. Go to **Contacts** → **Import Contacts**
Click **Import Contacts**.
**Note:** You can also access the contact import feature from **Settings → Workspace Settings → [Data Center](/settings/workspace-settings/data-center)**
 ### 2. Select your .CSV
Select a `.csv` file from your computer or make a copy of our [**shared Google Sheet (MessageDesk Contact Import Template)**](https://docs.google.com/spreadsheets/d/1P8JIfQngIJnMRo5cfCEf8gdxvIKpzmoeLEAfImYII58/copy)
**Note:** The file picker only accepts .**CSV type files**.
### 2. Select your .CSV
Select a `.csv` file from your computer or make a copy of our [**shared Google Sheet (MessageDesk Contact Import Template)**](https://docs.google.com/spreadsheets/d/1P8JIfQngIJnMRo5cfCEf8gdxvIKpzmoeLEAfImYII58/copy)
**Note:** The file picker only accepts .**CSV type files**.
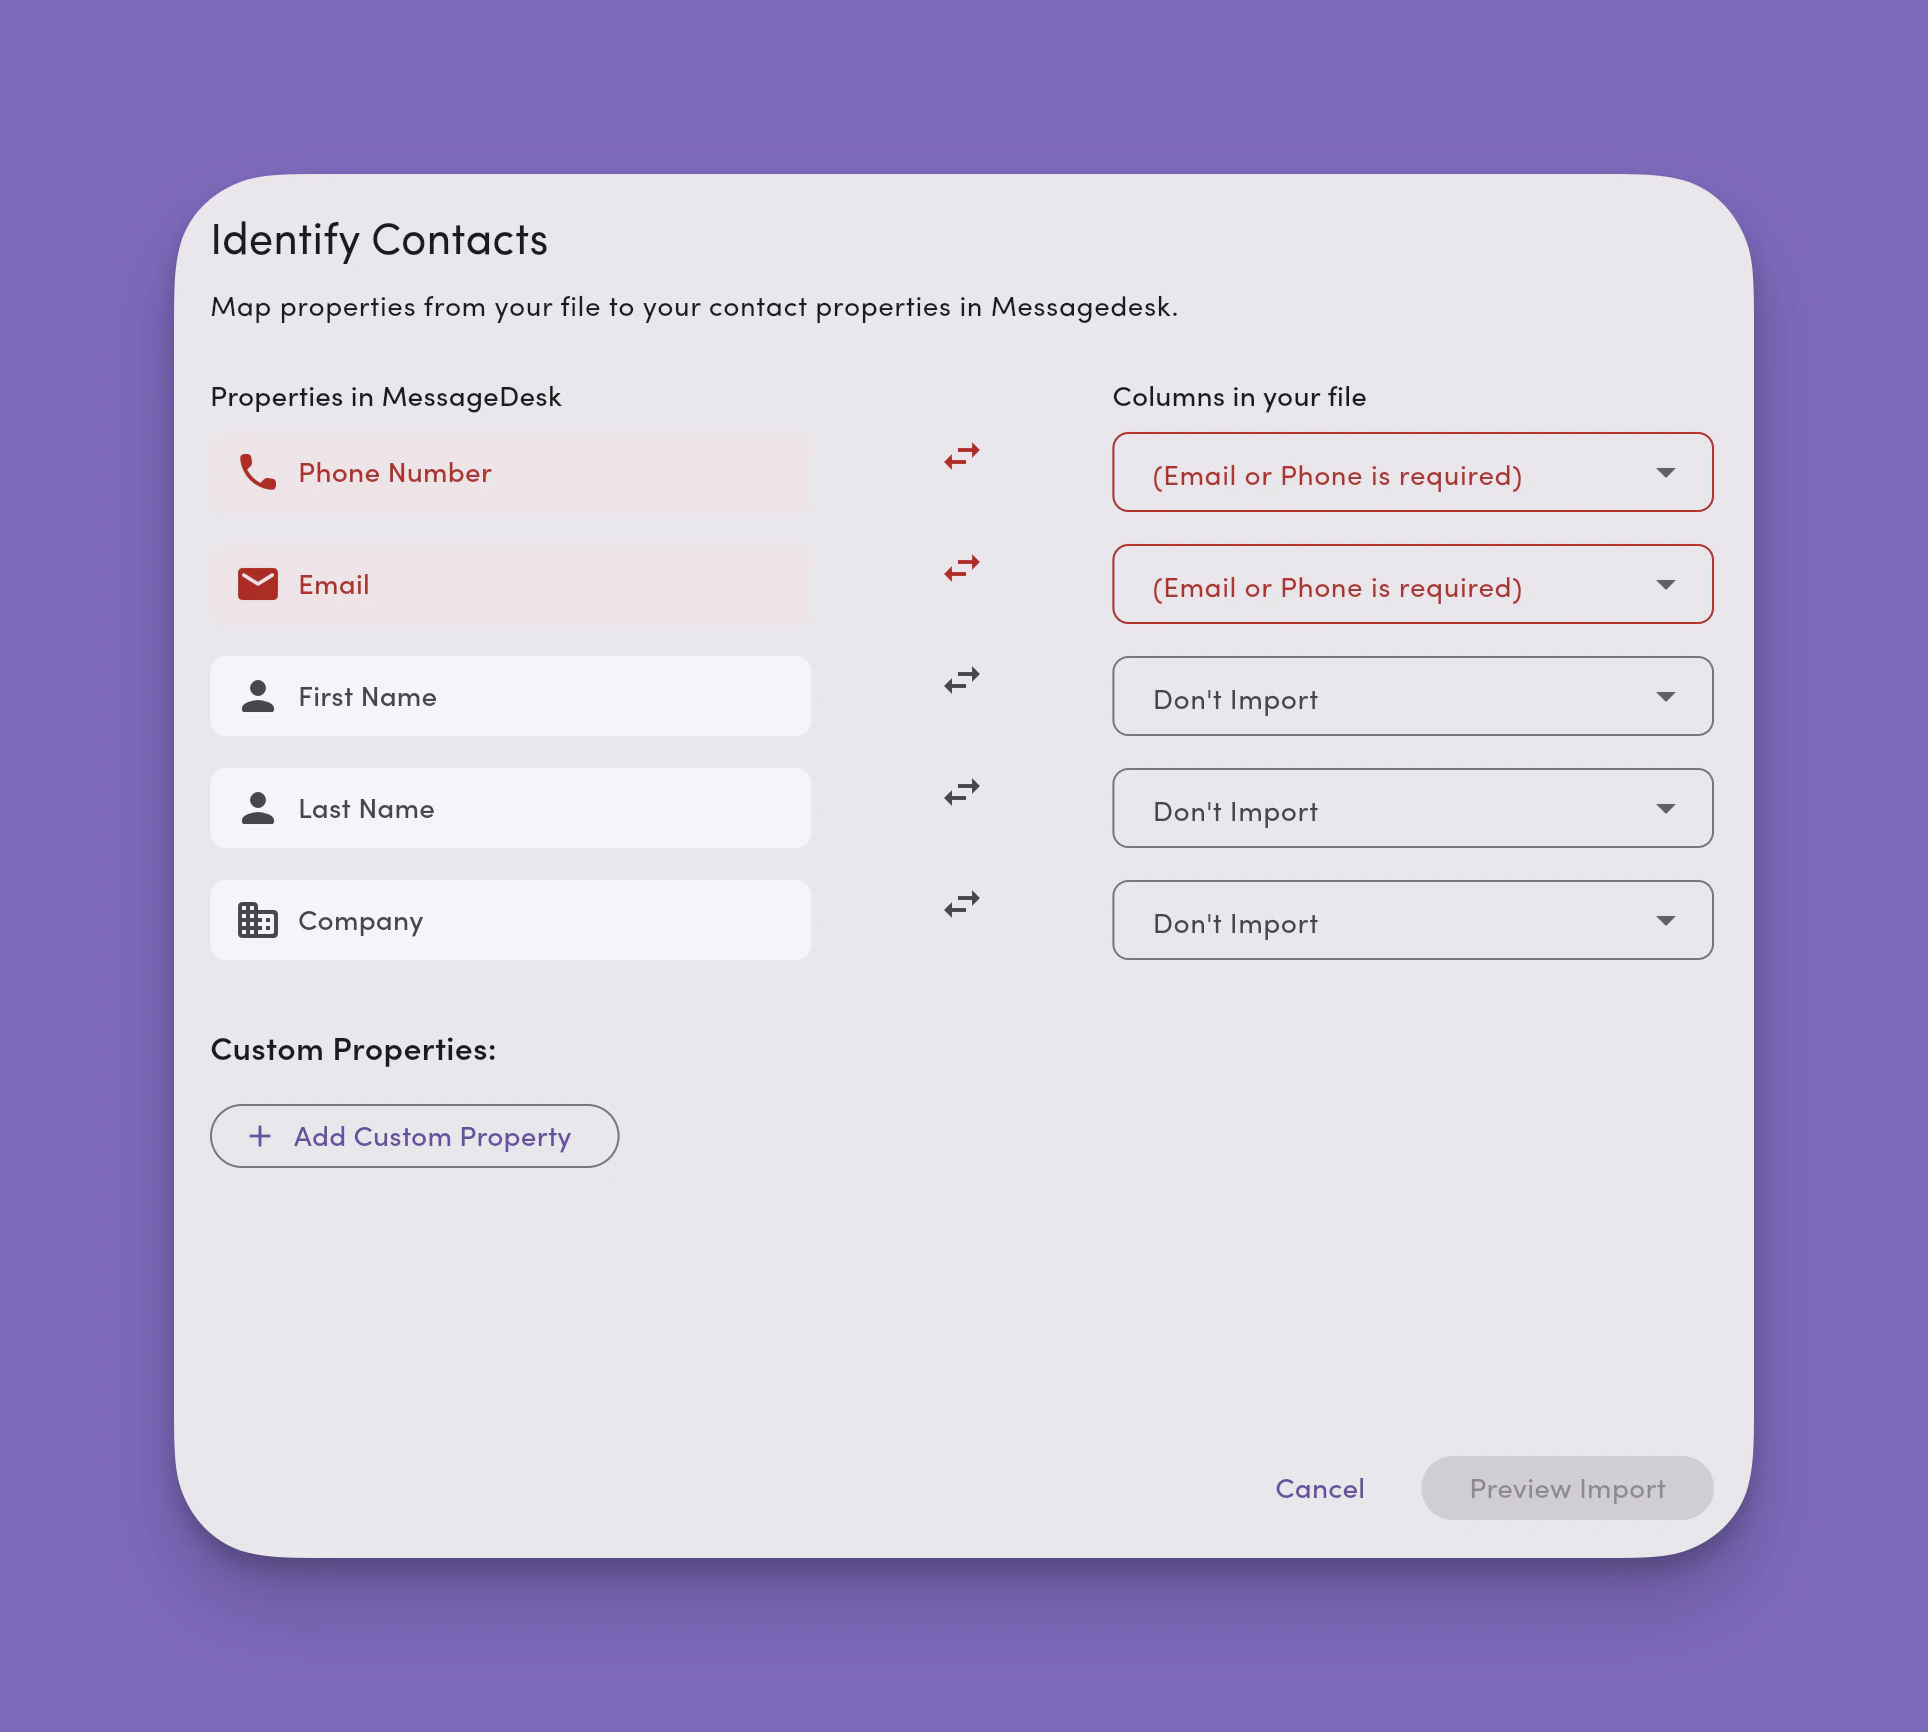
 ### 3. Identify contacts by mapping properties in MessageDesk to columns in your file
You can adjust the field mapping manually, but in most cases, fields will auto-map when column names match properties in MessageDesk.
Click **+ Add Custom Field** to map [custom fields](/settings/workspace-settings/custom-fields) from your .csv file to custom fields in MessageDesk.
**Note:** Email or Phone is a required property for every contact uploaded to MessageDesk.
### 3. Identify contacts by mapping properties in MessageDesk to columns in your file
You can adjust the field mapping manually, but in most cases, fields will auto-map when column names match properties in MessageDesk.
Click **+ Add Custom Field** to map [custom fields](/settings/workspace-settings/custom-fields) from your .csv file to custom fields in MessageDesk.
**Note:** Email or Phone is a required property for every contact uploaded to MessageDesk.
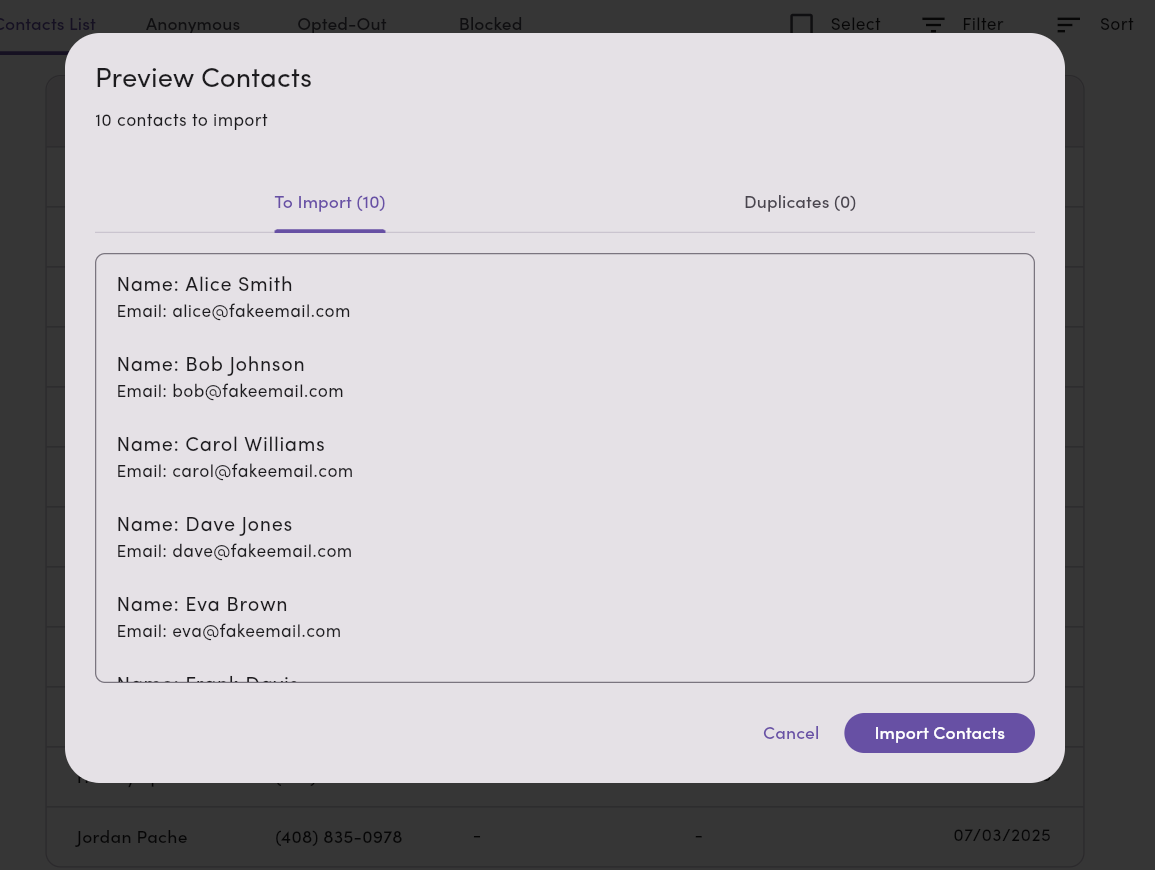
 ### 4. Fix duplicates and errors (preview step)
Click Preview Import to confirm that your fields are properly matched. MessageDesk validates your data and flags issues **before** import. Invalid rows are **skipped**.
### 4. Fix duplicates and errors (preview step)
Click Preview Import to confirm that your fields are properly matched. MessageDesk validates your data and flags issues **before** import. Invalid rows are **skipped**.
 ***
## Validation rules and what we check
* **Email**: must be a valid email address (`name@example.com`).
* **Phone**: must be in **E.164** format (e.g., `+15551234567`).
* **Custom fields**: must match defined **types** and constraints. See [custom fields](/settings/workspace-settings/custom-fields) for supported types.
* **Duplicates**: checked by **email** and **phone**. Matching contacts are **updated** rather than skipped (see [How duplicate updates work](#how-duplicate-updates-work)).
***
## How duplicate updates work
When an imported row matches an existing contact by **email** or **phone**, MessageDesk **updates** that contact instead of skipping the row:
* Updates only apply to columns you **mapped** in the import.
* A field is updated only when the mapped column has a **value** for that row. Empty values leave the existing field unchanged.
* Updates can apply to **standard fields** (first name, last name, email, phone, address, etc.) and **custom fields**.
***
## How imports run
* **Batching**: processed in batches up to **5,000** (aligned with the row limit).
* **Async processing**: large uploads are staged and processed on the server for reliability.
* **CSV only**: the importer accepts **.csv files**. Other formats aren't supported.
***
## Common errors and fixes
* **"CSV file is too large."**\
Split your file so each CSV has **≤ 5,000 rows** and **≤ 10 MB**.
* **"CSV imports are only supported on the desktop web platform. Please use the web interface for importing contacts."**\
Switch to the **web app** to run the import.
* **"Invalid phone format."**\
Convert to **E.164** (country code + number, no spaces).
* **"Invalid email address."**\
Correct typos or remove invalid emails.
* **"Row has an inconsistent number of columns."**\
Ensure every row matches the header's column count.
* **"Missing contact method."**\
Add **Email** or **Phone** for that row.
***
## Best practices
* **Normalize phones to E.164** before uploading.
* **Deduplicate** by email/phone first to avoid partial merges.
* **Test with 25 rows** to confirm mapping and validation.
* **Use [custom fields](/settings/workspace-settings/custom-fields)** intentionally. Ensure data types match your definitions.
* **Keep under limits** (≤ **5,000** rows, ≤ **10 MB**) for smooth importing.
***
## FAQ
**Can I import from my phone or desktop app?**\
No. CSV imports are **web-only**.
**Can I import other data (conversations, labels, messages, opt-outs)?**\
Yes. You can import messages via the [Data Center](/settings/workspace-settings/data-center). This doc covers **Contacts CSV**.
**What happens to skipped rows?**\
Invalid rows are **skipped**. Fix the CSV and re-import those rows separately.
**Can I update existing contacts?**\
Yes. CSV imports **update** existing contacts when an imported row matches an existing contact by **email** or **phone**. Only mapped columns with a value are updated. Empty cells leave existing fields unchanged. Updates apply to standard fields (name, email, phone, address, etc.) and custom fields.
***
## Validation rules and what we check
* **Email**: must be a valid email address (`name@example.com`).
* **Phone**: must be in **E.164** format (e.g., `+15551234567`).
* **Custom fields**: must match defined **types** and constraints. See [custom fields](/settings/workspace-settings/custom-fields) for supported types.
* **Duplicates**: checked by **email** and **phone**. Matching contacts are **updated** rather than skipped (see [How duplicate updates work](#how-duplicate-updates-work)).
***
## How duplicate updates work
When an imported row matches an existing contact by **email** or **phone**, MessageDesk **updates** that contact instead of skipping the row:
* Updates only apply to columns you **mapped** in the import.
* A field is updated only when the mapped column has a **value** for that row. Empty values leave the existing field unchanged.
* Updates can apply to **standard fields** (first name, last name, email, phone, address, etc.) and **custom fields**.
***
## How imports run
* **Batching**: processed in batches up to **5,000** (aligned with the row limit).
* **Async processing**: large uploads are staged and processed on the server for reliability.
* **CSV only**: the importer accepts **.csv files**. Other formats aren't supported.
***
## Common errors and fixes
* **"CSV file is too large."**\
Split your file so each CSV has **≤ 5,000 rows** and **≤ 10 MB**.
* **"CSV imports are only supported on the desktop web platform. Please use the web interface for importing contacts."**\
Switch to the **web app** to run the import.
* **"Invalid phone format."**\
Convert to **E.164** (country code + number, no spaces).
* **"Invalid email address."**\
Correct typos or remove invalid emails.
* **"Row has an inconsistent number of columns."**\
Ensure every row matches the header's column count.
* **"Missing contact method."**\
Add **Email** or **Phone** for that row.
***
## Best practices
* **Normalize phones to E.164** before uploading.
* **Deduplicate** by email/phone first to avoid partial merges.
* **Test with 25 rows** to confirm mapping and validation.
* **Use [custom fields](/settings/workspace-settings/custom-fields)** intentionally. Ensure data types match your definitions.
* **Keep under limits** (≤ **5,000** rows, ≤ **10 MB**) for smooth importing.
***
## FAQ
**Can I import from my phone or desktop app?**\
No. CSV imports are **web-only**.
**Can I import other data (conversations, labels, messages, opt-outs)?**\
Yes. You can import messages via the [Data Center](/settings/workspace-settings/data-center). This doc covers **Contacts CSV**.
**What happens to skipped rows?**\
Invalid rows are **skipped**. Fix the CSV and re-import those rows separately.
**Can I update existing contacts?**\
Yes. CSV imports **update** existing contacts when an imported row matches an existing contact by **email** or **phone**. Only mapped columns with a value are updated. Empty cells leave existing fields unchanged. Updates apply to standard fields (name, email, phone, address, etc.) and custom fields.