Add individual contacts one-by-one, or import many via CSV
You can create a single contact or bring in thousands at once with a CSV. Here’s how, and the limits to avoid errors.Add an individual contact
1. Go to Contacts
Click + Add Contact. On desktop, this opens a dialog where you can create the contact without leaving the page.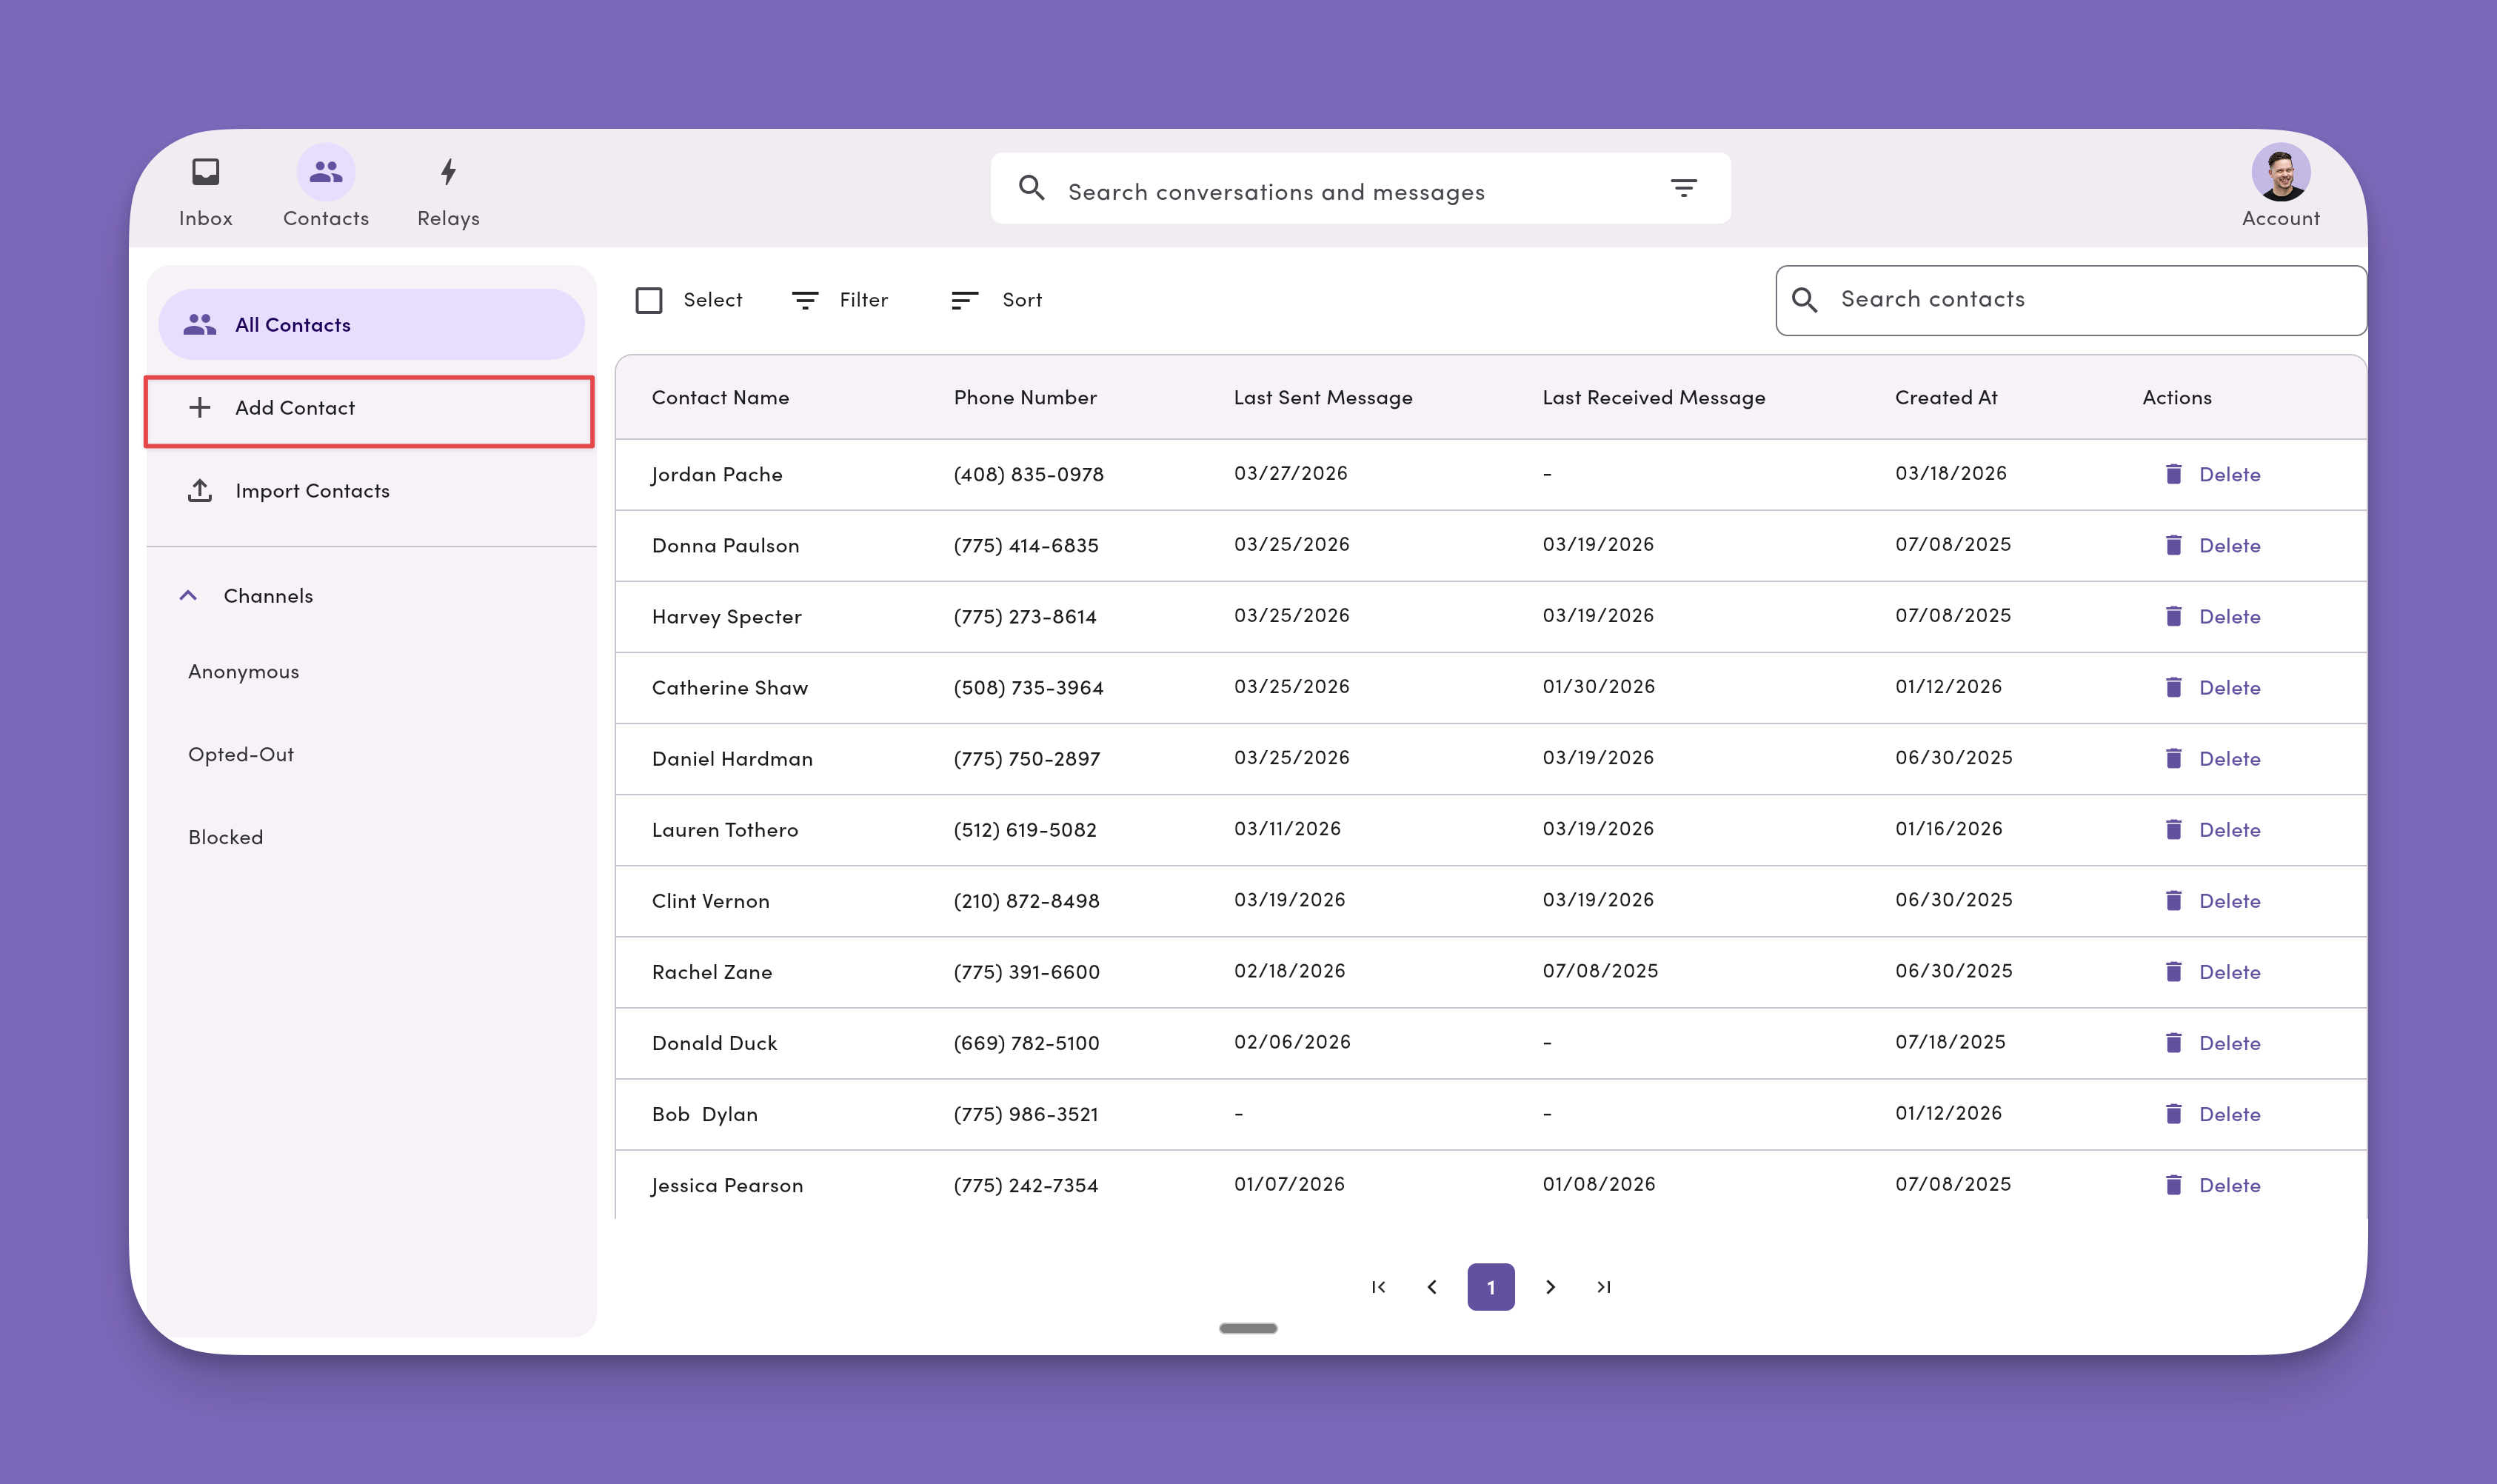
On mobile, clicking + Add Contact navigates to a separate page instead of opening a dialog.
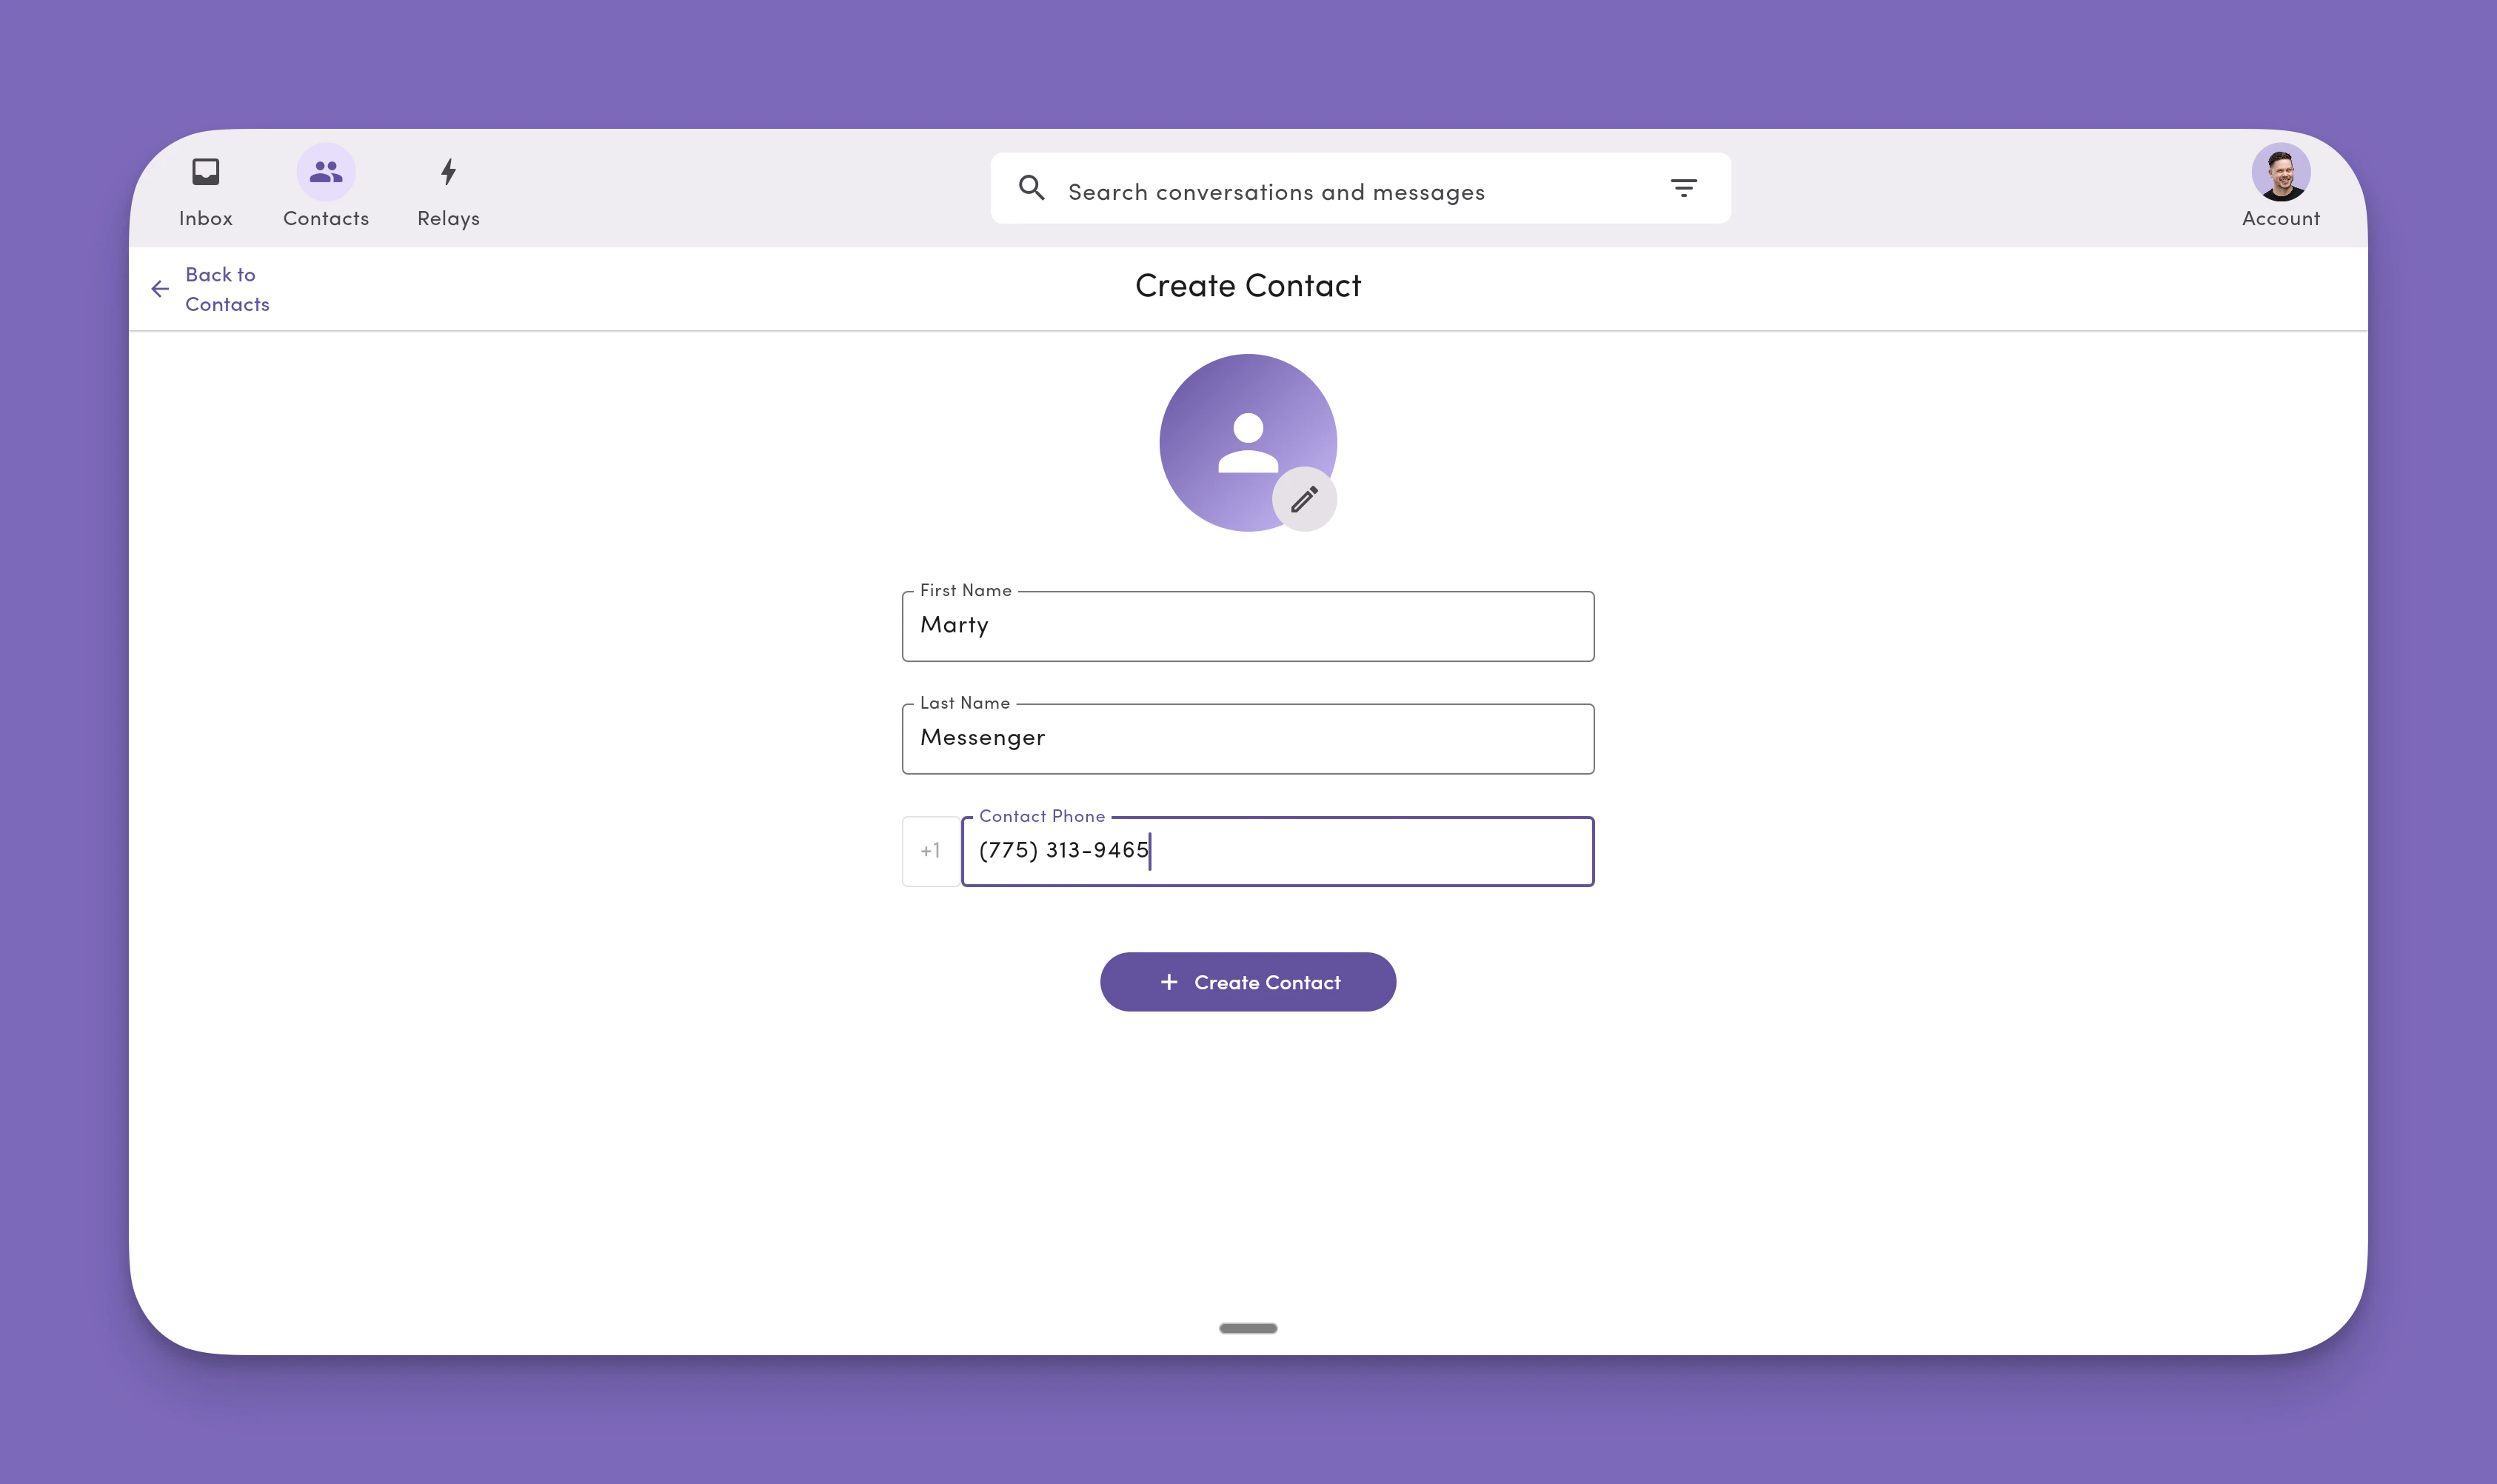
2. Enter details
Add First name, Last name, and Phone, then click + Create Contact.First name, last name, and phone number are required when creating contacts. Phone numbers without names are treated as anonymous contacts until you add contact details later.
3. View and edit the contact
From the contact panel, you can:- Add additional phone numbers.
- Copy the contact’s number.
- Send a message from the Inbox.
- Unlink (“delete”) a number from the profile.
- Block the contact from messaging your workspace.

Delete or edit a contact
To permanently remove a contact from your workspace:- Go to Contacts.
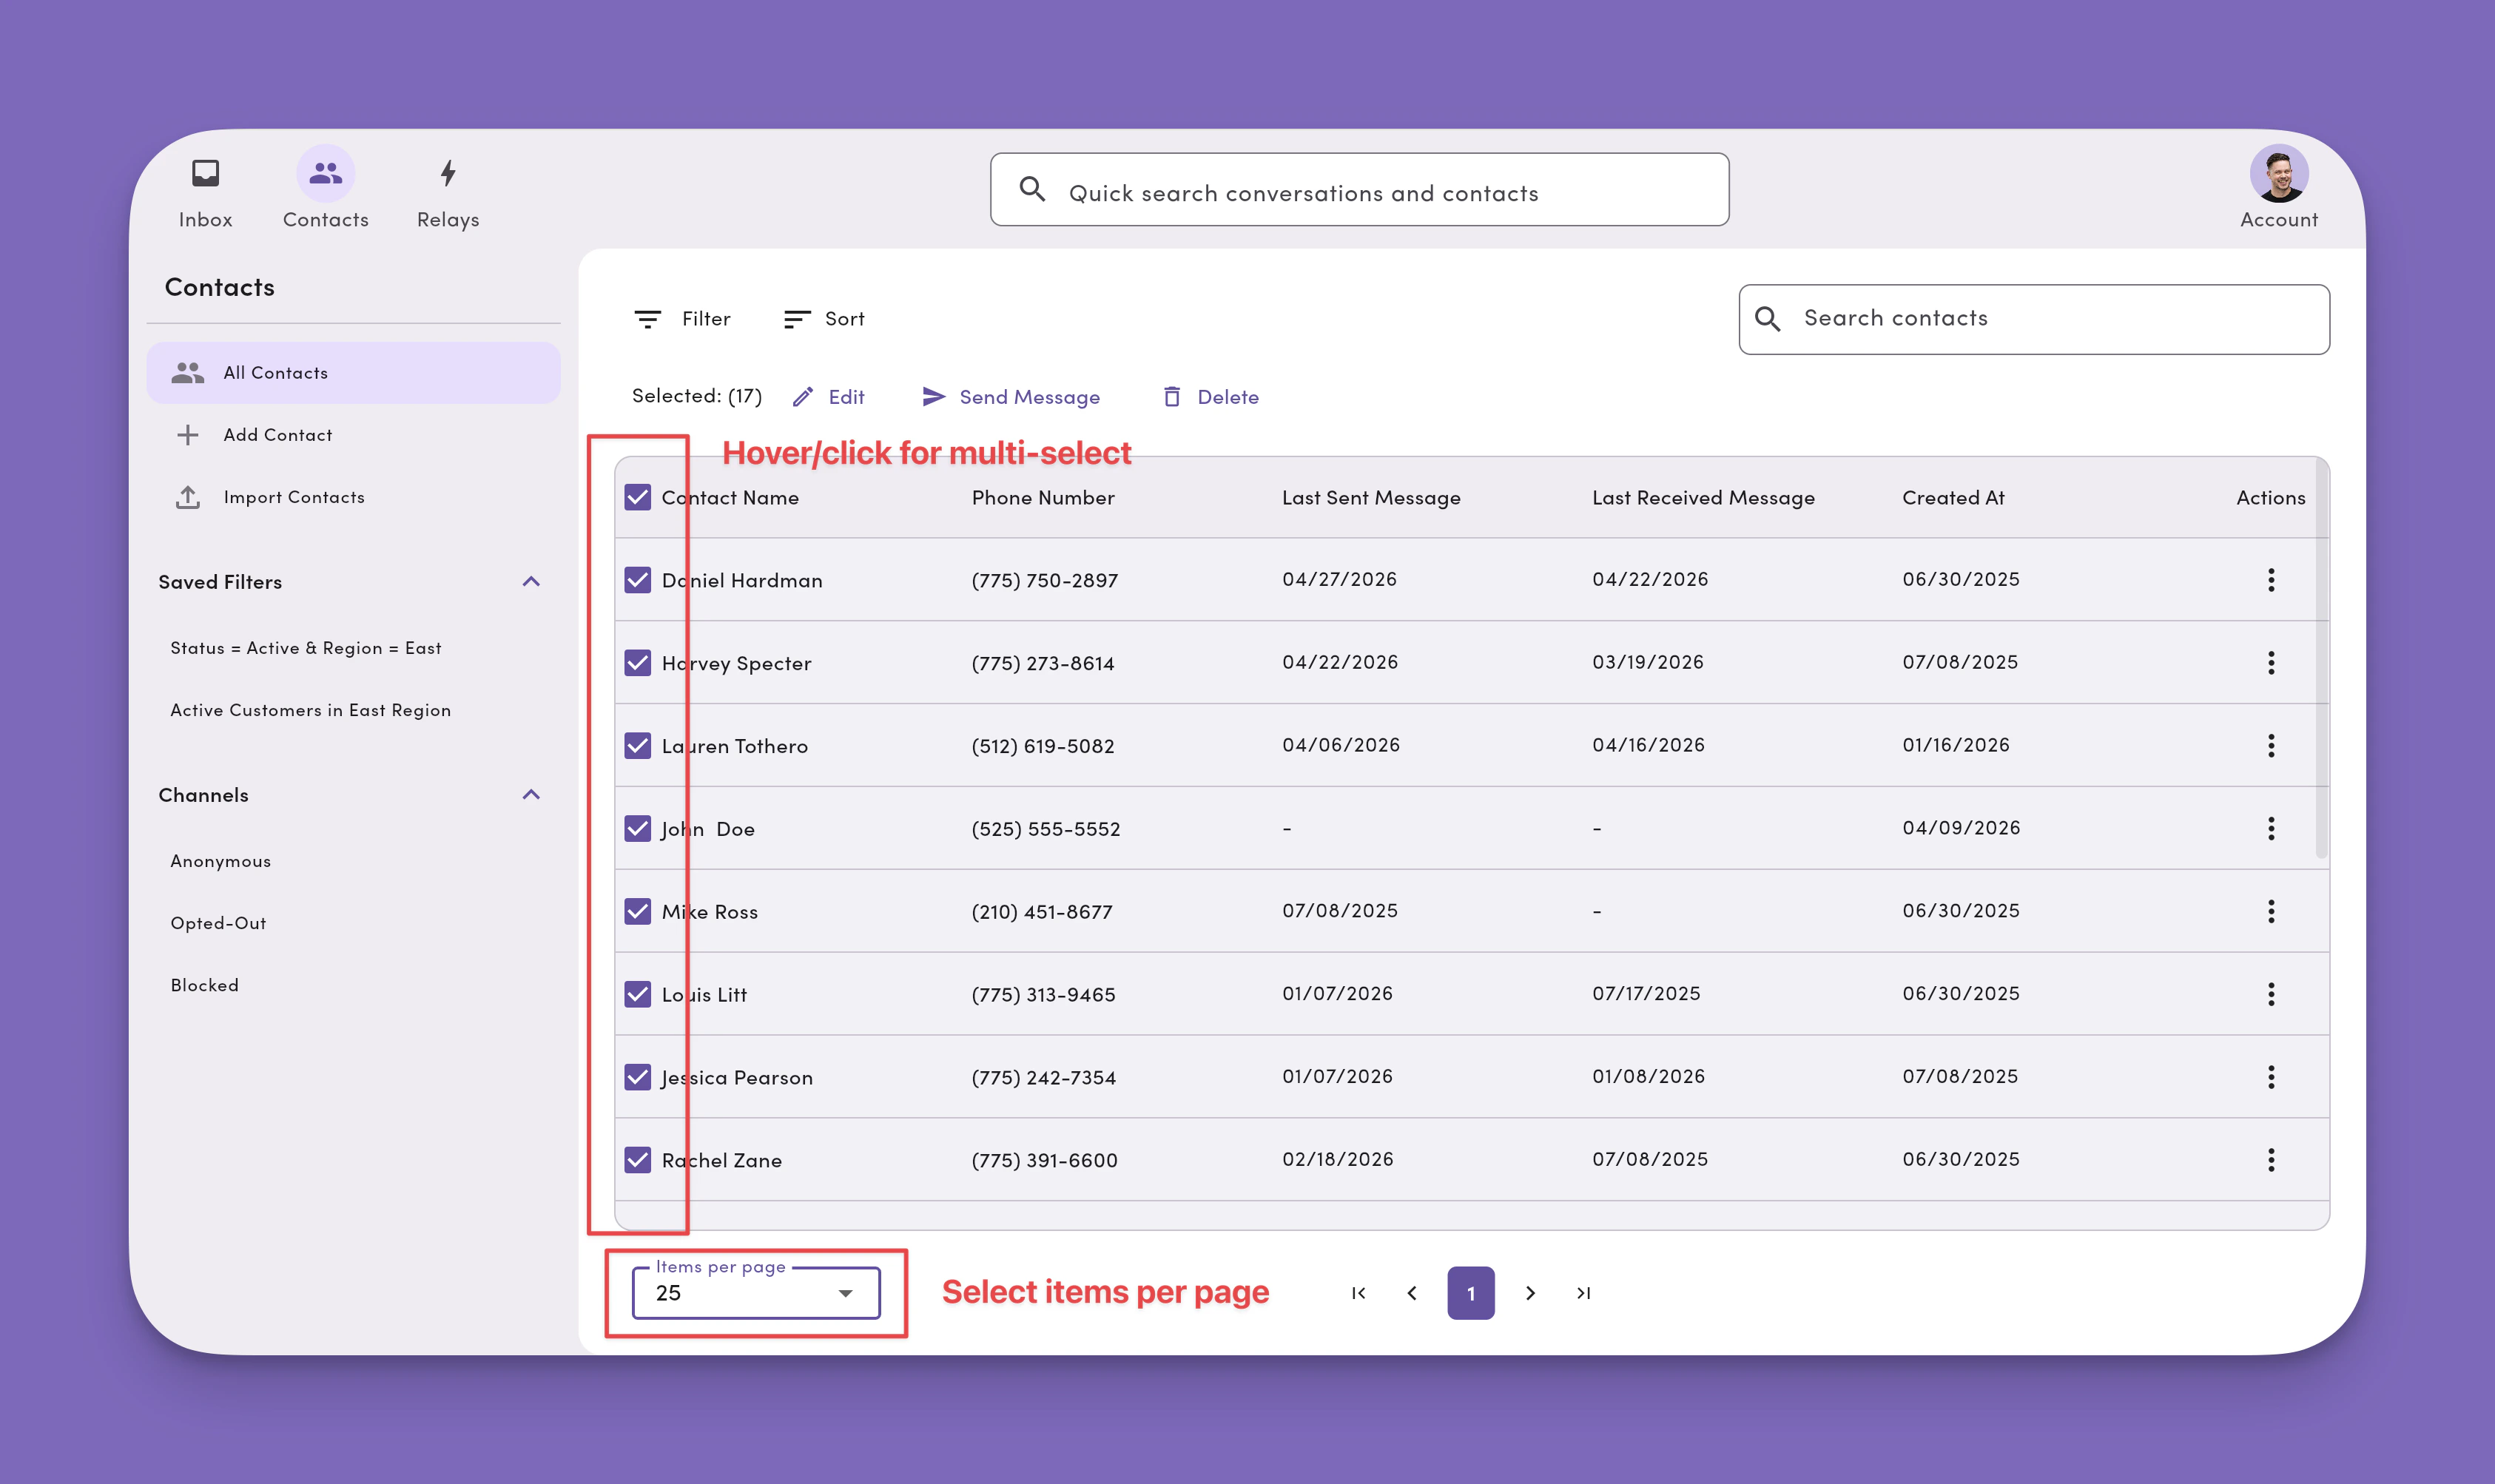
- Find and select the contact(s) you want to delete.
- Select your items per page (25, 50, 100, or 250)
- Hover and click to select individual contacts or multiselect the entire page
- Click the vertical ellipse icon to delete an individual contact.
- Confirm the deletion or edit when prompted.
Sort contacts
Click the Sort dropdown menu above the contacts list to change the sort order. Available sort options include:- Alphabetical by first name (A–Z)
- Alphabetical by last name (A–Z)
- Newest: most recently added or updated contacts at the top
- Oldest: oldest contacts at the top
Sort is a dropdown menu (not a toolbar). Open the menu, pick an option, and the contacts list re-orders immediately.
Search contacts
The search bar appears only on filtered Contact views (saved filters or any applied filter). To search, first apply or open a saved filter, then use the search bar to find contacts within that view.The search bar is not available on All Contacts. Use a filter or saved filter to search a specific subset of your contacts.
Filter contacts
The Contacts module lets you filter contacts based on their properties saved in MessageDesk. You can use Criteria and Conditions to create various types of filters.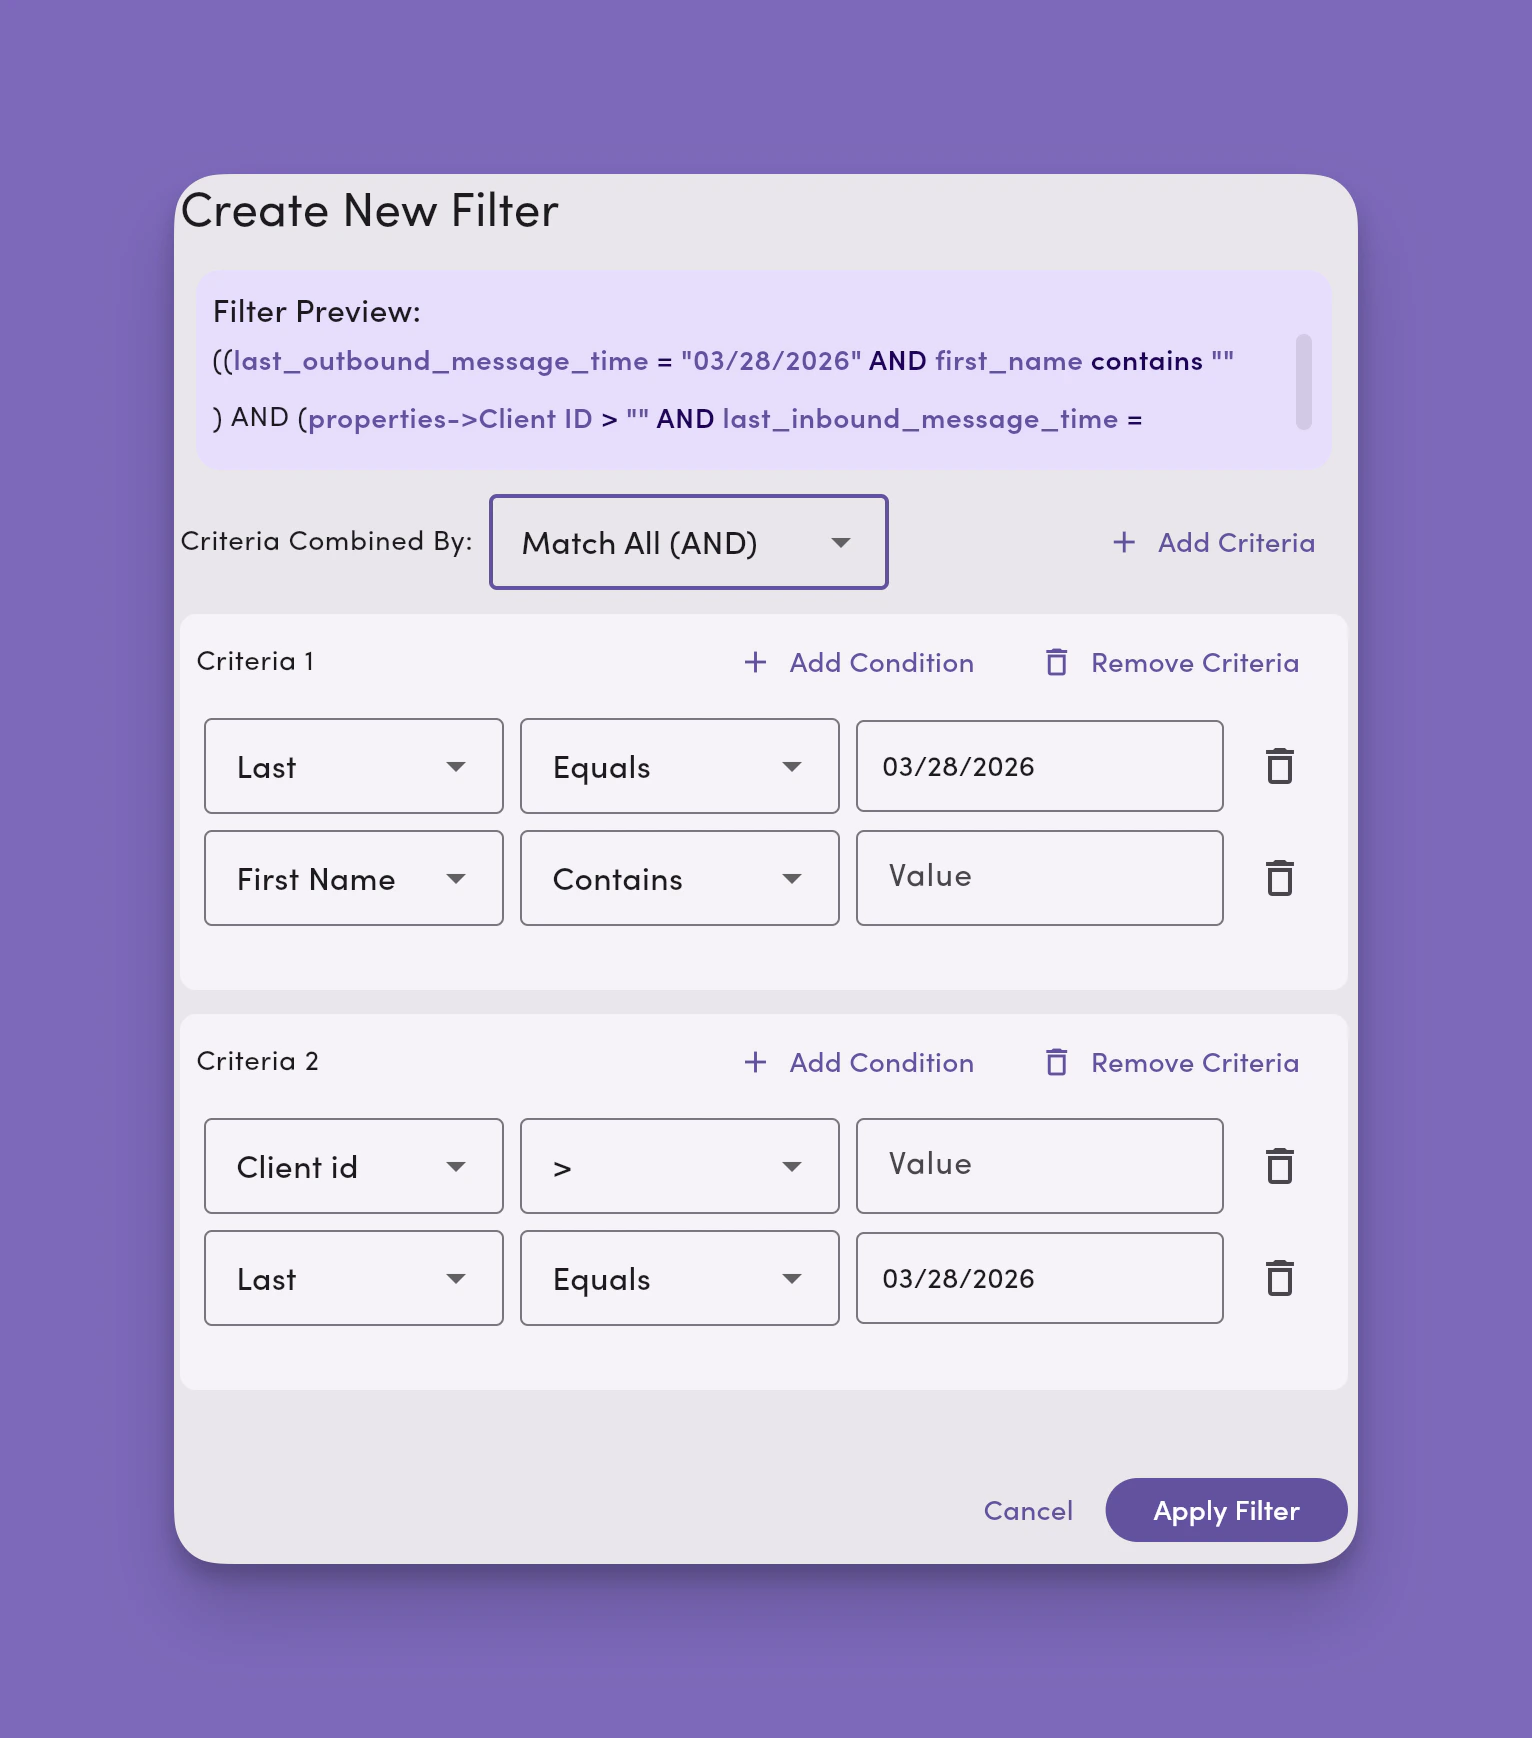
Add criteria
Criteria are a set of conditions. You can add as many criteria as you like to a filter. As you add criteria, you’ll see a filter preview. Criteria work in two ways: creating AND and OR statements.- Selecting Match All (AND) means all criteria must meet the filter’s conditions.
- Selecting Match ANY (OR) means any criteria must meet the filter’s conditions.
Add conditions
Conditions are based on data fields saved and populated as part of the contact’s profile in MessageDesk. You set your filter on conditions on standard fields like:- First Name
- Last Name
- Last Outbound Message Time
- Last Inbound Message Time
Condition operators
Use condition operators to create logical expressions for your filters. The types of operators available depend on the field’s data type (true/false, dropdown, date, number, phone, and text).Available condition operators
- Contains
- Equals
- In
- Is Empty
- > (greater than)
- >= (greater than or equal to)
- < (less than)
- <= (less than or equal to)
- NOT Contains (does not contain)
- NOT Equals (does not equal)
Save and edit filters
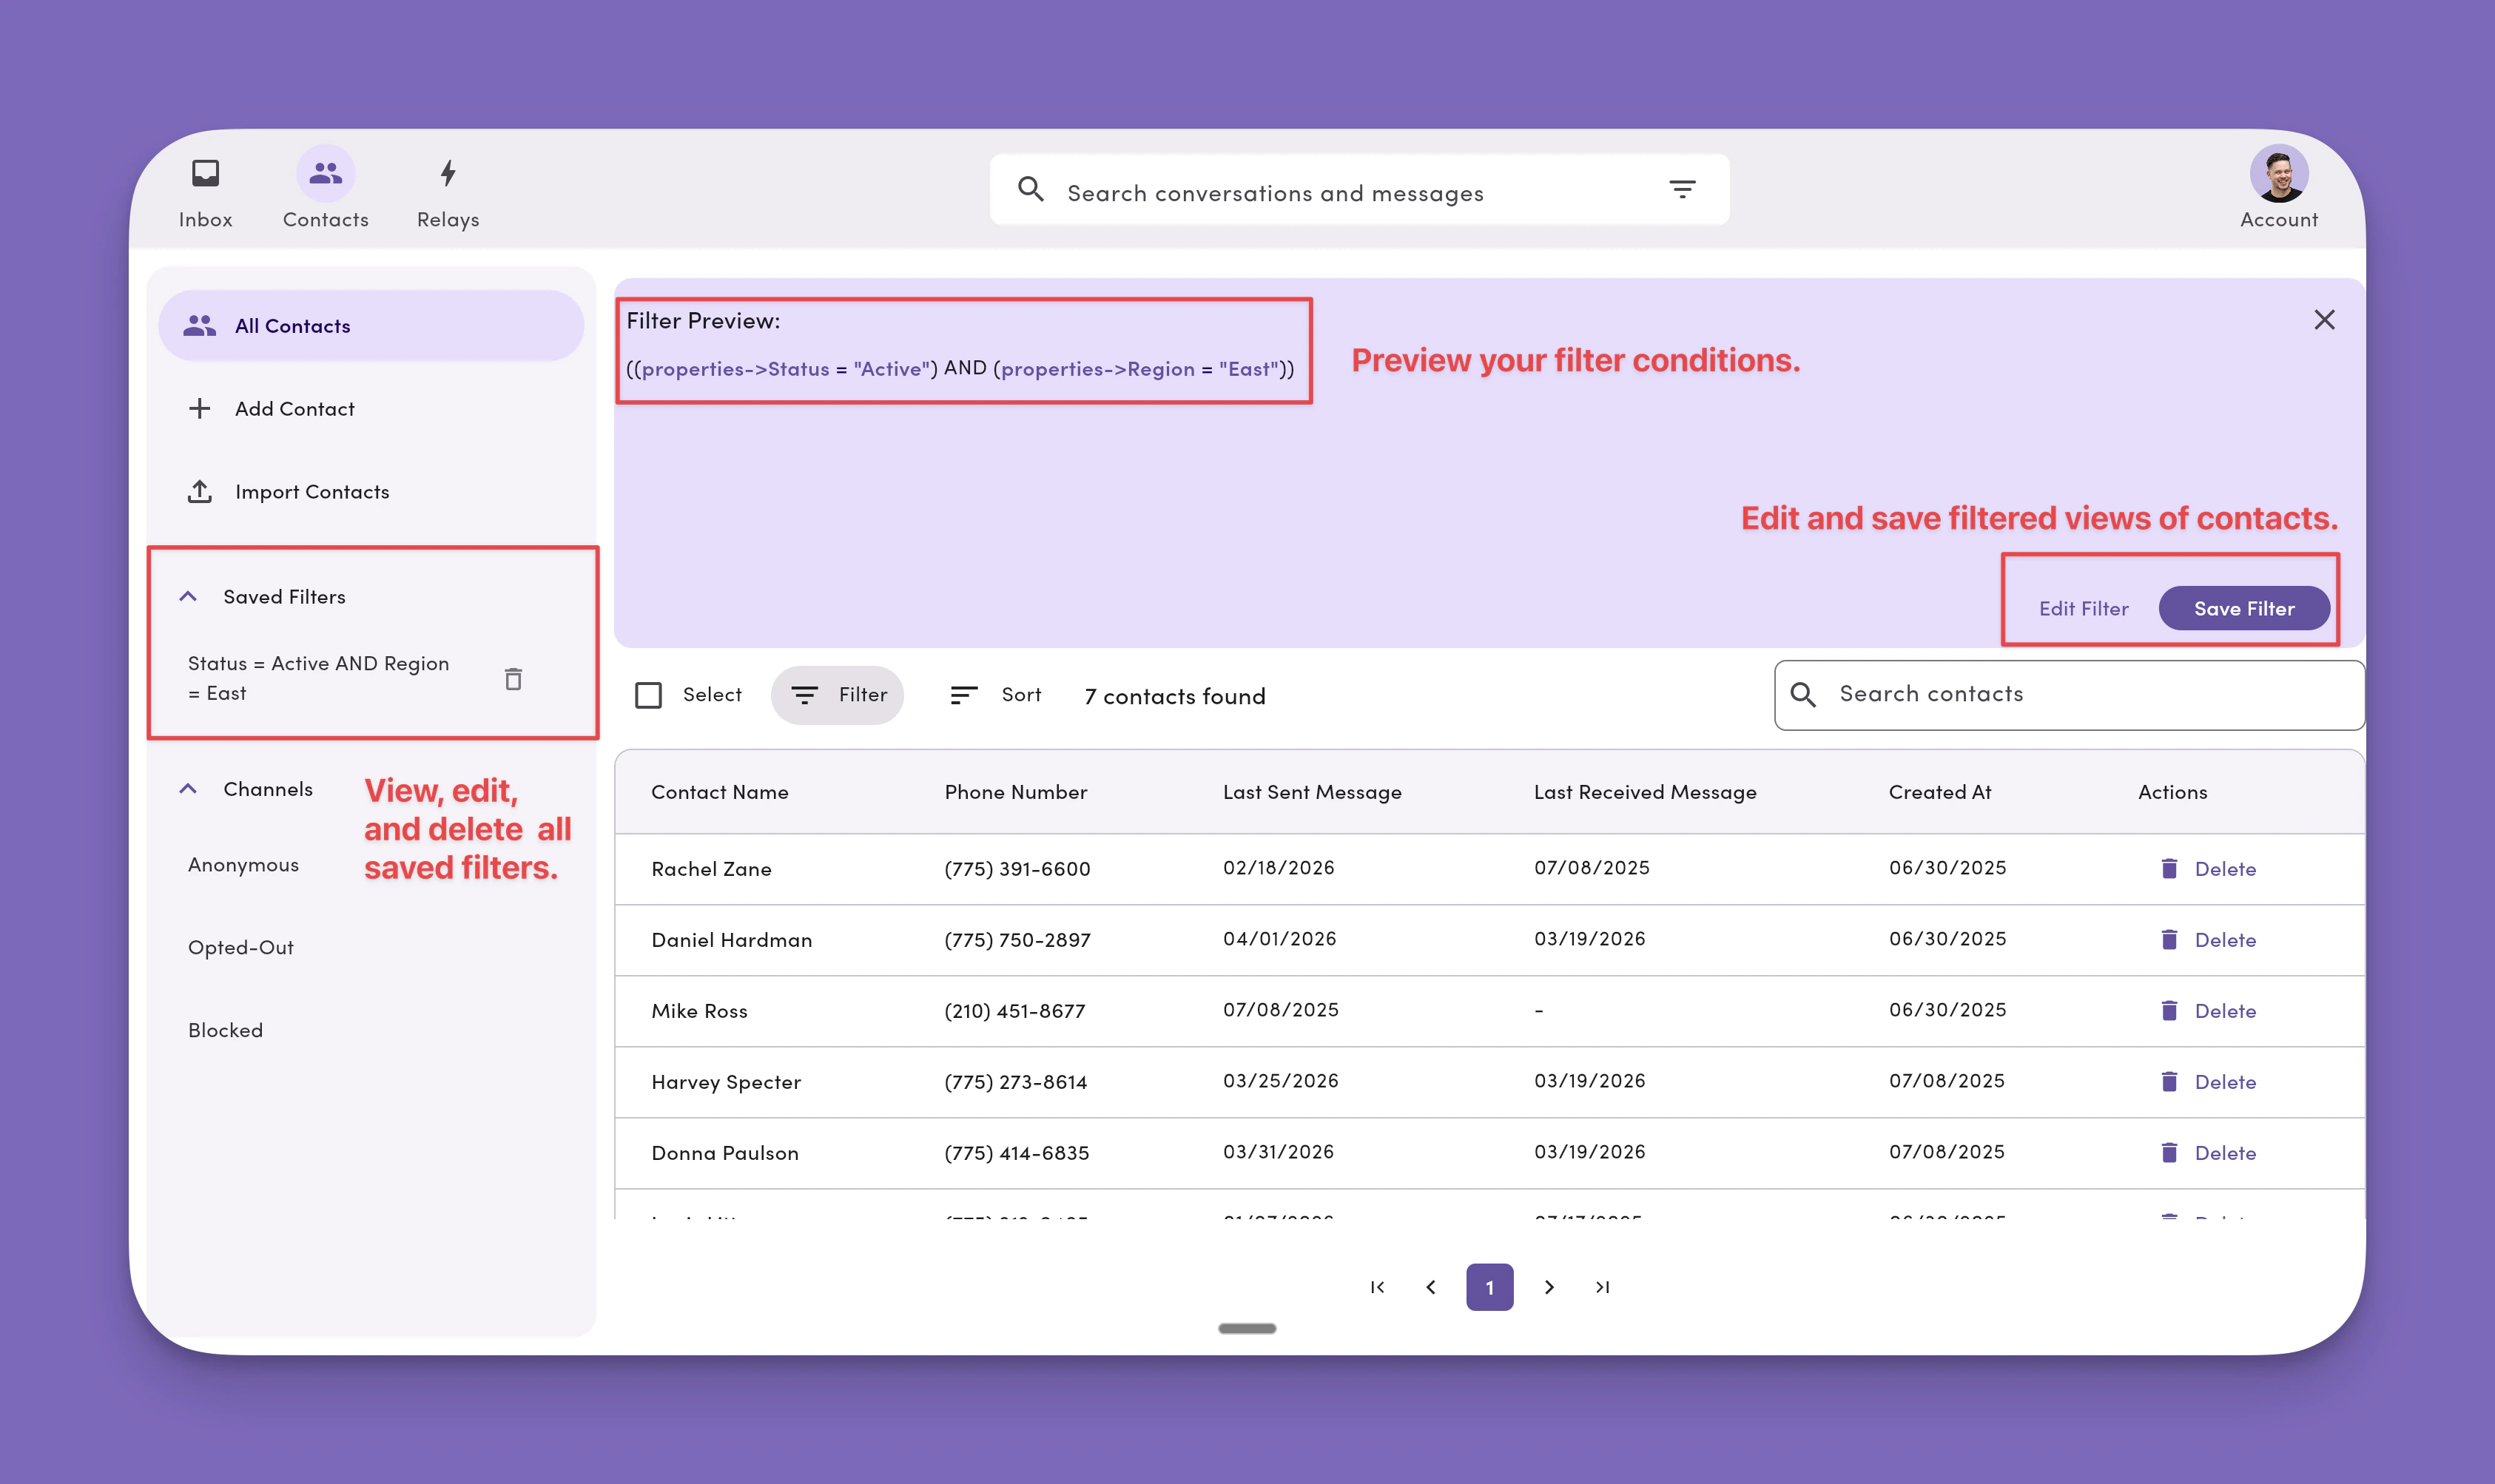
- Click Save Filter.
- Give your filter a name.
- Click Save.
Search saved filters
Use the search widget in the Contacts side menu to quickly find a saved filter by name. Selecting a result navigates to Contacts with that filter applied.Saved filter search is available on the desktop web app only. It’s not available on tablet or mobile, since filters can’t currently be managed in Contacts on those platforms.
- Search matches against the filter name only (not its criteria or conditions).
- The widget follows the same design as the global search bar and the Contacts search bar for a consistent experience across MessageDesk.
Delete a saved filter
To remove a saved filter:- Delete the saved filter from the Contacts side menu.
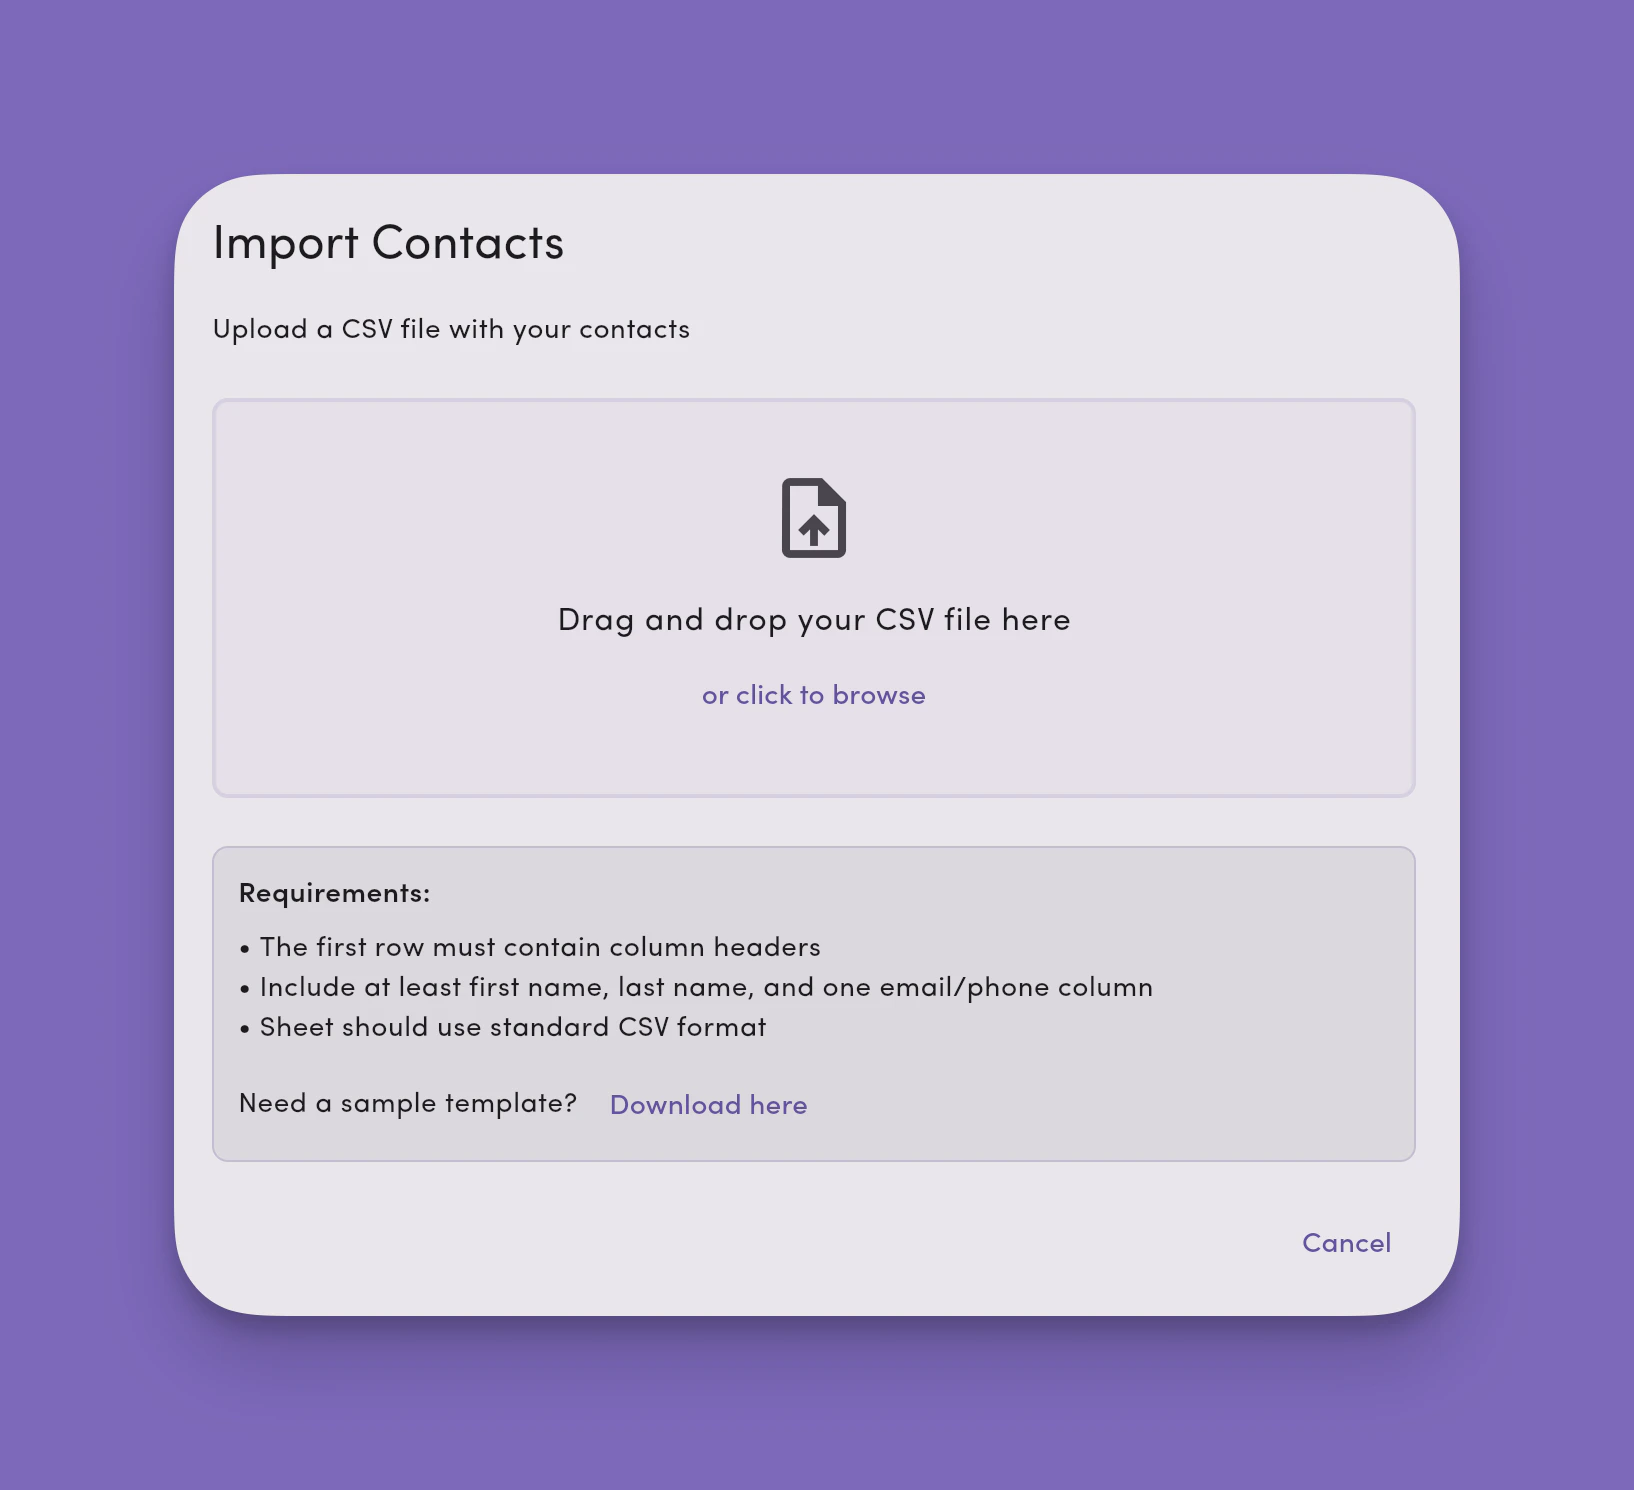
Import contacts in bulk via CSV
Upload contact lists in bulk when you have a large amount of contact information to bring into MessageDesk.CSV limits and requirements (read first)
TL;DR
- Row count: up to 5,000 rows per CSV (hard limit)
- File size: up to 10 MB
- Platform: Web-only (imports aren’t supported on mobile/desktop apps)
- Format: must use .csv files with a header row, UTF-8 encoding
- Required per row: Email or Phone (at least one)
1. Go to Contacts → Import Contacts
Click Import Contacts.Note: You can also access the contact import feature from Settings → Workspace Settings → Data Center

2. Select your .CSV
Select a.csv file from your computer or make a copy of our shared Google Sheet (MessageDesk Contact Import Template)
Note: The file picker only accepts .CSV type files.
3. Identify contacts by mapping properties in MessageDesk to columns in your file
You can adjust the field mapping manually, but in most cases, fields will auto-map when column names match properties in MessageDesk. Click + Add Custom Field to map custom fields from your .csv file to custom fields in MessageDesk.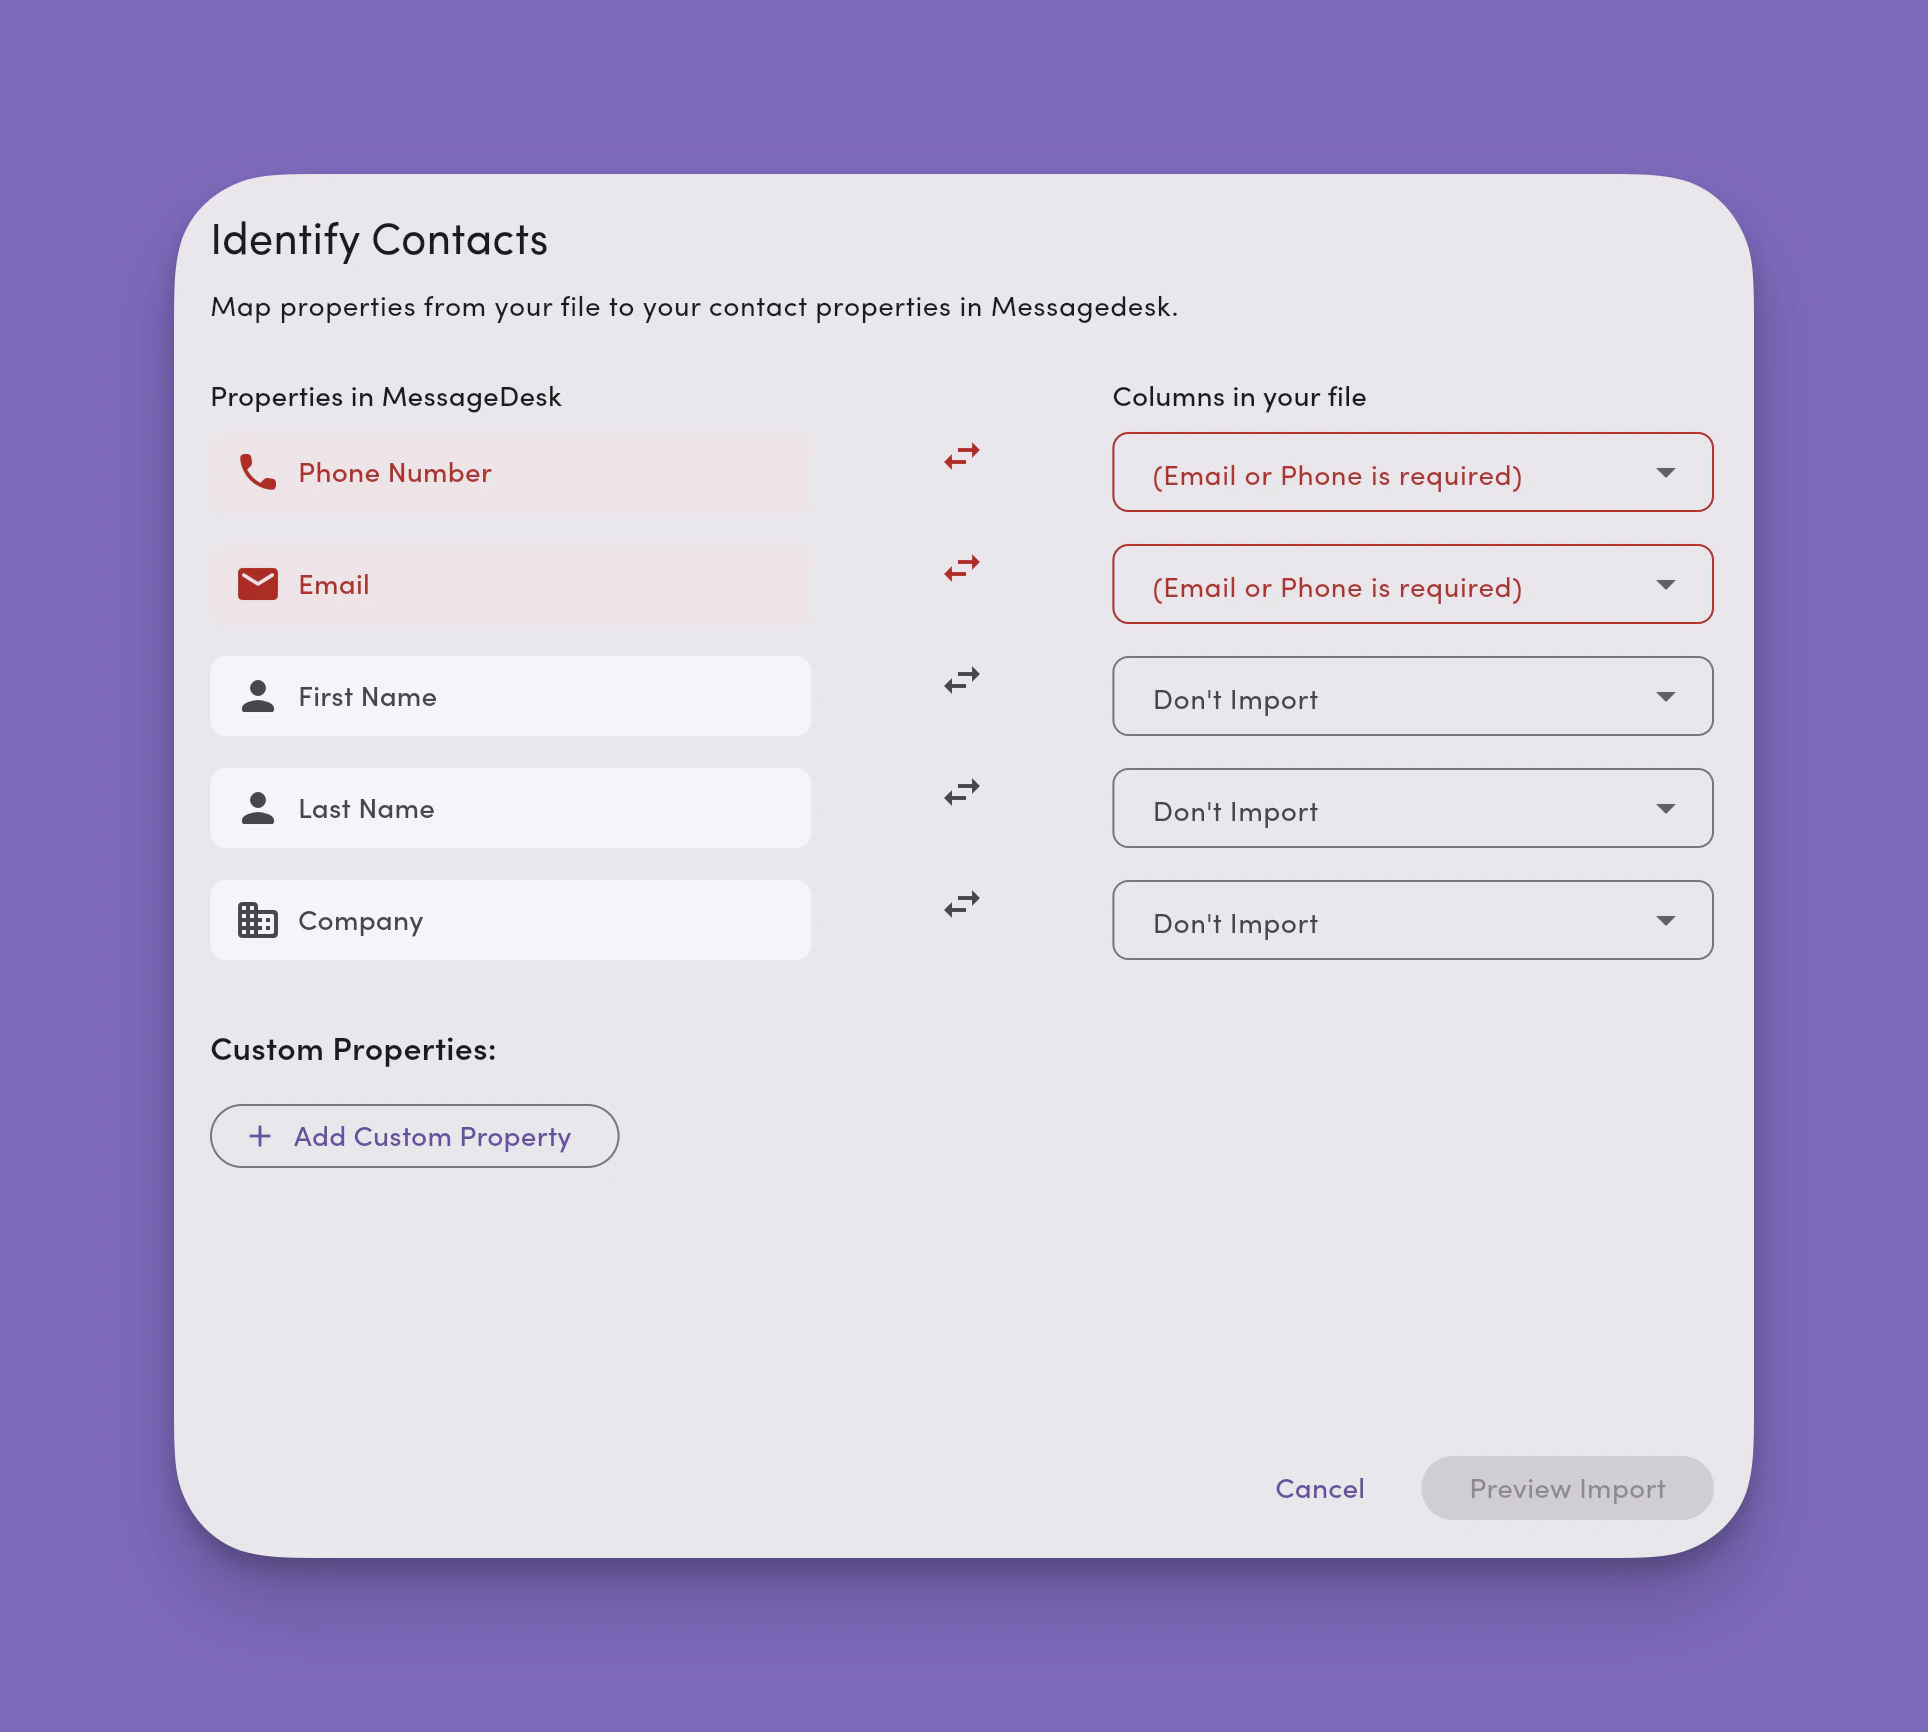
4. Fix duplicates and errors (preview step)
Click Preview Import to confirm that your fields are properly matched. MessageDesk validates your data and flags issues before import. Invalid rows are skipped.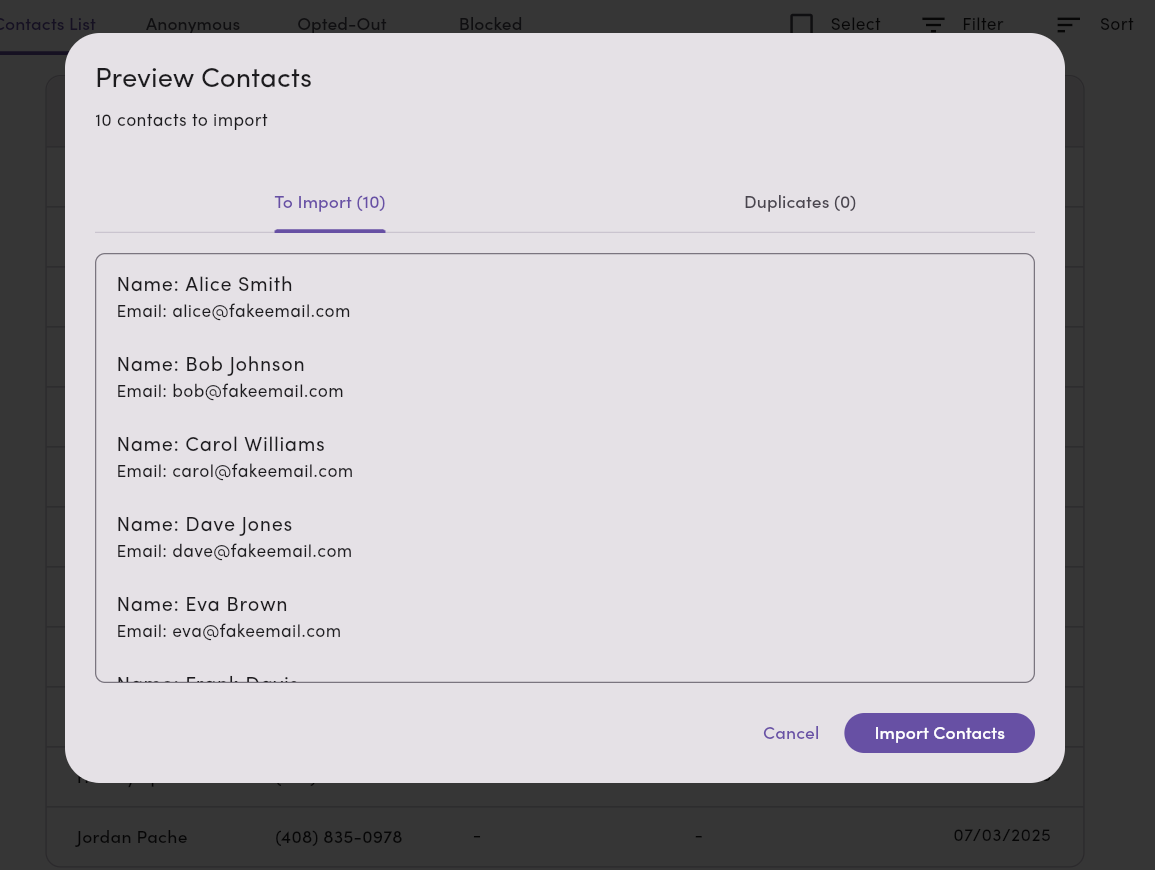
Validation rules and what we check
- Email: must be a valid email address (
name@example.com). - Phone: must be in E.164 format (e.g.,
+15551234567). - Custom fields: must match defined types and constraints. See custom fields for supported types.
- Duplicates: checked by email and phone. Matching contacts are updated rather than skipped (see How duplicate updates work).
How duplicate updates work
When an imported row matches an existing contact by email or phone, MessageDesk updates that contact instead of skipping the row:- Updates only apply to columns you mapped in the import.
- A field is updated only when the mapped column has a value for that row. Empty values leave the existing field unchanged.
- Updates can apply to standard fields (first name, last name, email, phone, address, etc.) and custom fields.
How imports run
- Batching: processed in batches up to 5,000 (aligned with the row limit).
- Async processing: large uploads are staged and processed on the server for reliability.
- CSV only: the importer accepts .csv files. Other formats aren’t supported.
Common errors and fixes
- “CSV file is too large.”
Split your file so each CSV has ≤ 5,000 rows and ≤ 10 MB. - “CSV imports are only supported on the desktop web platform. Please use the web interface for importing contacts.”
Switch to the web app to run the import. - “Invalid phone format.”
Convert to E.164 (country code + number, no spaces). - “Invalid email address.”
Correct typos or remove invalid emails. - “Row has an inconsistent number of columns.”
Ensure every row matches the header’s column count. - “Missing contact method.”
Add Email or Phone for that row.
Best practices
- Normalize phones to E.164 before uploading.
- Deduplicate by email/phone first to avoid partial merges.
- Test with 25 rows to confirm mapping and validation.
- Use custom fields intentionally. Ensure data types match your definitions.
- Keep under limits (≤ 5,000 rows, ≤ 10 MB) for smooth importing.
FAQ
Can I import from my phone or desktop app?No. CSV imports are web-only. Can I import other data (conversations, labels, messages, opt-outs)?
Yes. You can import messages via the Data Center. This doc covers Contacts CSV. What happens to skipped rows?
Invalid rows are skipped. Fix the CSV and re-import those rows separately. Can I update existing contacts?
Yes. CSV imports update existing contacts when an imported row matches an existing contact by email or phone. Only mapped columns with a value are updated. Empty cells leave existing fields unchanged. Updates apply to standard fields (name, email, phone, address, etc.) and custom fields.